Monday 21 June 2021

Dark Angels - Macragge Tactical Squad - Shading

Afternoon #warmongers and #warhammercommunity I've been #paintingwarhammer this Macragge tactical squad. A quick one, but not necessarily quick to get here. After the last post I added the next set of highlights on all the metallics. I also cleaned up some of the green and added red where it needed to be.


Now in most GW tutorials they might have advised and additional coat of Caliban green on all the respective areas but I was adding load of black shade wash so it didn't need to be perfect. I'll be cutting back in with green highlights anyway.


Once that's done I'll also be blending in the darkest areas with black. I say blend, it's just thinned down black that I can easily fade, with some drybrushing in places - did you ever notice you don't get the chalky effect drybrushing black? Worth thinking about for those ultra dark colours.


Note the additional purity seal on the back of the squad leader. The back pack has a load of glue on that banner and a lot of the detail has been obscured. I thought an extra purity seal might just cover up the mess. 


Unfortunately the worst of it is on the front of the backpack, but there just isn't room for another seal to hide things. Hopefully the banner itself will proved a better focus point and maybe the blessed verdigris will hide the rest of it...


Slow but steady progress. Green highlights will be a challenge. If I can set a goal four highlighted in a night that will help me reconcile the remaining tasks. Even so this is far quicker than I expected. I genuinely feared I wouldn't get these done but I'm about a third the way through, here's roughly what's left:
  • Marines bronze
  • Marines blessed verdigris
  • Marines green
  • Marines eyes
  • Marines freehand symbol
  • Marines freehand knees
  • Marines leather pouches
  • Marines purity seals
  • Marines odds & sods
  • Marine face
  • Marine banner
  • Marines bases
  • Marines varnish

Friday 18 June 2021

Dark Angels - Macragge Tactical Squad - Metallics

Afternoon #warmongers and #warhammercommunity I've been #paintingwarhammer this Macragge tactical squad. It's funny how coming to the conclusion that these are my priority can overcome the perceived obstacles they face. I've gone on record numerous times about how I find my own brassy bronze recipe a challenge.


I don't know why that is and I don't know why I persist in following the same process knowing full well it can sap my motivation. Thankfully, this is not currently the case and coming to terms with the task had meant I've got the Army Painter Rough Iron [Warplock Bronze] on.


I would normally follow up with Balthasar Gold but it had run our and I used VGC Hammered Copper instead. It is indeed slightly more copper coloured [reddish] than the Citadel paint.


However, as you can see Retributor Gold on top and the forthcoming additional highlight, wash and blessed verdigris will blend/obscure the slightly warmer tone of the VGC paint.


While I was at it I started one of the Aegis Defence Line gun emplacements. It's missing the additional textures I've previously applied to the ADL, Bastions and other terrain elements


But I just wanted to get going and not faff about. I've actually got a couple more of these and the las-cannon turrets to do. If this goes well as is I'll follow up on them. If it feel lacking I'll ensure they get that extra texture.


As I was doing metals, it made sense to do the same on the Talonmaster


Can't wait to get onto tidying all these up. I have an overwhelming belief they'll take much less time than I imagine. I want to be pleasantly surprised, perhaps bottle that feeling and get some other Ravenwing built and prepped and jump onto them too. I have 3 attack bikes afterall and 3 bikes I was going to convert to be Black Knights too.


The extra weapons, master and gunner also got done, but I didn't take pictures. I have this feeling of absolute hobby satisfaction - my mojo is up, I'm motivated and willing I just need time to capitalise on that energy.

Wednesday 16 June 2021

Blood Bowl - Halfling Team - Crackling

Afternoon #warmongers and #warhammercommunity I've done a bit more #paintingwarhammer on my Halfling #BloodBowl team. I know I just said I had other stuff to focus on but that was a conclusion I came to as I was doing this. This was a big step - covering the red basecoat in white in readiness for the fluoro pink.


Weird in a way because I liked the red, but also the white looks pretty cool too.


And big jump here. The fluoro pink went on and it's been highlighted a couple of times [mixing in white]. The weather turned very warm so the paint was drying quite rapidly


I also added some Army Painter Skeleton bone pinstripes, but felt they need defining a bit more, hence the additional Khorne Red 'drop-shadow'. I've added some Bloodletter glaze in the recesses and highlighted all the tops of creases to get extra definition.


I added the criss-cross of the crackling pattern on the helmet and shoulder pads. It's frustrating in a way as when I did it on my original models decades ago I was actually neater. I tried adding the Skeleton Bone for more definition, still to add the cloves, although the helmet studs suffice there. That said the criss-cross pattern is all over the shop on the helmet, so I'm a little underwhelmed.


While I was at it I did some of the same crackling bits on this Hefty - shoulder pads, helmet, highlighted the skin and did the eye.


Cloves will be in the centre of the criss-cross I see examples where they're placed both in the centre of the square and at the juncture of the cuts.


This helmet is the most representative of a ham, but the shoulder pads - I'm kicking myself at the difference in size of the patterns :(


The catcher also got crackled and a first set of highlights, and his eyes, slightly skew-whiff but passable. I need to work out how to do a flushed complexion on a dark skintone next.


I also remembered to make his palms and soles of his feet lighter skinned. It's a small detail that I believe can be overlooked and as I continue to explore varied skintones it was worth doing. One thin coat on the palm of his hand already looks quite effective.


I have to admit I'm not quite as pleased as I hoped to be with the pink, or the crackling for that matter. I'm pretty sure that the varnish will tone things down, it's currently a bit glossy in places which makes it odd. I think the pinstripes really help the model, but overall it is very, very busy and the crackling pattern is all over the place - which is where most of my disappointment lies.

Half the team will have brown shoulder trim, the other half orange to make the crackling effect bolder. I want to get these three completed, perhaps do the orange basecoats on all the rest... but now I want to get all the metallics done on my tactical squad too - time and motivation [plus cooler working conditions] please!

Monday 14 June 2021

Whats on my palette?

Bless me #warmongers for I have sinned, it's been almost six months since my last confession! I've known exactly what I needed to paint so it didn't really require an overview to keep track.


I was reasonably productive over this period and only have these 4 items still on my immediate palette:
  • Adeptus Titanicus - at least one Warhound
  • Adeptus Titanicus - weapons
  • Blackstone Fortress - Amallyn Shadowguide [she was in my review last Feb!]
  • Deathwing Land Raider
But most of those are either voluntarily or involuntarily on hiatus and I need to think about what I really should be focussing on. I know I just posted about the Halfling test model but that is interim 'busy work' to keep my momentum and won't be sustainable once it's complete. So, the thing that has popped into my head is #ArmiesOnParade2021. Early? True but these are what I might need.
  • Dark Angel Macragge Tactical Squad
  • Ravenwing Talon Master
  • Aegis Defence Line weapon mount
  • Munitorum Containers...
  • And the Deathwing Land Raider
The Tactical Squad is a huge challenge - I'm just not into them. The Talon Master may not be needed for the AoP board, but certainly the metals can be done concurrently with the Tactical squad which puts me close to getting it done also. The weapon mount too is an extension to the tac squad and might look cool in the display. The Munitorum Containers may not be necessary, but might be interesting to throw up inbetween tasks.

I'll also be finishing off the Land Raider, it's just a little bit to do really, with the decals. And I'll continue with the odd Blood Bowl Halfling while I'm at it. But all these will give me something new to form part of my display. It'll predominantly be my existing armies, so I need something fresh to add, but I think it'll be an interesting new narrative display this time round. Part of me also wants a 22"x30" board as it will display better that way, but I don't have a 30" backdrop either. We'll see how it goes.  I'm hoping to get these things done as soon as possible so I can practice the display, we'll just have to see.

Importantly, it gives me focus and a goal. That deadline may not yet be set but I can get a headstart on it and feel motivated to get stuff done.

Friday 11 June 2021

Blood Bowl - Halfling Team - Test Model

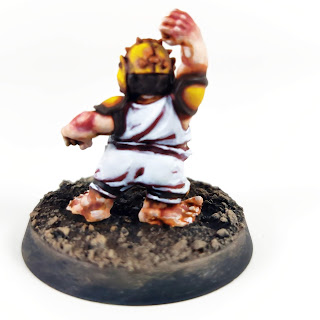
Afternoon #warmongers and #warhammercommunity I've started #paintingwarhammer on my Halfling #BloodBowl team. The Land Raider is paused, while I try to resolve the decal situation and I didn't want to go back to the Titans, so it was test model. I wanted to get some practice on the face and the kit. The face was coming along really well and then I decided to add eyebrows...

 
Big mistake, I was not taken by them at all. he reminds me of an actor, but I can't place which one, actually is it Scorsese? Anyway, I wasn't having it. I added some orange to the armour plates.


And then yellow to make the 'crackling'. I did brown edging but I may mix that up - some with brown some with all yellow. As you can see I also painted over the eyebrows and despite it being a cheat I think he works much better. I added a little more purple round the nose to get a very flushed face. I also painted some belly fluff, which looks gross and cool and also makes me miss the plain belly I had originally - mixed emotions.


The feet are my least favourite element, I do love the knuckles and elbow though, I got some tips from the Art of War's painting tutorial.


Now I was focussing on one miniature as a test, but as I had excess paint in certain instances I used it on a couple of other players. So I've got the yellow done on this, although I've thinking an addition highlight might be needed. That might work our when I've done the crackling criss-cross.


This guy also got some yellow done. I maybe should have done his dinner plate number badge with the yellow. I may do one some different ones, like a camping plate - ceramic white with blue rim. A silver one etc. Just play around for a bit of fun.


I have to take the plunge and do the pure white highlight on the clothes next in preparation for the fluoro pink. I have to be brave and remember my Tyranid Void Shield Generator efforts and how well they came out.


Really pleased with the test so far. Need to move them along but I am feeling a little drained at the moment and given the pause in the Land Raider really need to focus on what's next...

Wednesday 9 June 2021

Inspiration is a chain

Afternoon #warmongers and #warhammercommunity in July 2012 we were just getting 40k 6th edition. I'd fallen off the hobby wagon a couple of years earlier. The painting aspect was progressing - I was happy with my results and being productive. I'd also started a blog, designed my own terrain templates and built some of my own Imperial terrain but I wanted to do more. Combining my first major success - conversion of a Tyranid Carnifex to Tervigon and 6th edition's new found love of fortifications and it was potential Tyranid structures that caught my imagination. I searched all over the place, well Google did most of the heavy lifting and I came across these by Mr. Pink [a.k.a. Modern Synthesist]. The idea of using fruit pots as a base for more organic alien walls was genius. I have an A-level in Art, had specialised in sculpture and clay, I could find a way to mold some of these out of Milliput.


Within a month I had started my own. The naivety of using greyboard as a base - convinced it wouldn't warp [it didn;t reall, I was very lucky]. The ingenuity of stapling the reversed pot between the two main pieces. The stupidity of using your own Aegis wall templates as the scale, when you'd got those sizes wrong and essentially built a defence line that was just too big and legally you would never be able to use all 4 long pieces! 😫


And they came out pretty cool, even if it was before I settled on my Red Planet BASE! showcase pics, enjoy the pleather!


But that gave me the confidence to go even further with my next build - Tyranid Bastion. Arguably my most difficult build ever, but at this stage I had no idea what was still to come.


I built 6 Capillary Towers with a secret agenda all along that nobody twigged.


I had a shadow project running all along - making a Tyranid Skyshield Landing Pad that slid into slots in the Capillary Towers to create the platform. It would even get fleshy walls too, eventually. Completed over 6 months on and off - testament to perseverance and patience.


I'd spend another 6 years [more off than on, obviously] realising another vision of a Tyranid Void Shield Generator. And I think it was this that kind of brought some of this full circle.


I'd repeatedly shared comments with Mr. Pink about his inspiration all those years ago and he also bought the Necron half of my Indomitus box, which I sent to Canada for a crazy new future at his hands. Shortly thereafter he messaged me to say he had something he wished to share with me, and eventually I received this in the post.


What treasures lie within?


Inspiration come home...


Yes indeed, one of the first casts of Mr Pink's alien barricades.


All primed and ready to go.


But that wasn't all...


How about the original sculpt as well, so I can see in detail how it was made in sections.


Using a mix of Apoxie sculpt and green stuff.


Additionally, there was an alien xenoforming pod. This one is slightly unfinished but I think the completed ones had LED tea lights in to glow with an alien light.  


As you can see part of it needs filling in and I may one day consider doing that and even painting them up, but for now I'm just overjoyed about the generosity.


Compared with my own efforts - a little taller and much more detail. There's even some guitar wire in there for extra alien ribbage.


The inside detail is amazing in comparison. I'd say I was just starting out, but I'd probably still do much the same nowadays anyway!


And comparing the xeno-pod with my own Quad-gun.


I'd probably start with a fruit pot like this second time around. Using a plastic cork resulted in the 'mushroom-esque' shape of mine, when a blob would have been better.


Mr Pink described this inspiration as a chain - linking us across an ocean. How he inspired me and how I may well be inspiring others. That's the greatest gift of the hobby - sharing what we do. Being brave enough to put it online. Not worrying if it follows any prescribed lore but scratching that creative itch in our brains - the vision you cannot just leave there. How you sketch it in a noteboook. Buy fruit pots and noodle bowls because you can turn then into bizarre alien constructs and when the dust [or slime] settles you look back at your creation and realise you made it, as well as painted it. You made it from scratch, from bits of rubbish, clay and string and all because you saw someone else do something similar. Have a think and see if you want to be part of this chain too.