Tuesday 14 July 2015

Dark Angels Scouts - MOAR pics.

Sorry to eek this out [money for old rope?] it just seemed far too many pictures for one post but moving on the scouts are perfect for shooting from cover :)


So here's some individual close-up shots so you can pick out all the detail.


Quite pleased with the tread on his boot. And yes, I think the camo does look like leaves.


Notice I did three types of chevroned cable, back-slash, vertical and forward-slash, just to add a bit of variety. can't decide which I like most.


Company markings on the missile launcher scout, really like how the mix between brass and bronze worked on this.


And his oversized camo cloak doesn't look too bad now.


I also did some litany scripts alongside the chapter symbol poking out of the camo cloak.


Interestingly the Bolt Pistol is from the Space Wolves but I actually think that wolf on top look more like a lion


That'll be handy because it looks like there are Space Wolf Plasma Pistols that do the same thing and as Space Wolf weapons are going for buttons on ebay I may well use some Plasma Pistols to make Plasma Talon upgrades on a spare set of Dark Vengeance bikers so I can have more Ravenwing Knights.


Another visor, the Tamiya Clear Orange X-26 manages to rescue all my lens effects and it's further augmented with Vernidas gloss varnish, it still shrinks a bit but it's much thicker than acrylic gloss varnish.


OK, so more of the same but as I've mentioned things are a bit disrupted at the moment. I am still getting to do little bits of hobby, some really exciting things but I am flitting from one project to another. Snip bits of sprues here, scrape mold lines there it's all stuff that needs doing, it's just not particularly photogenic so please understand if things go a bit quiet over the next couple of weeks. 

Also, the man cave is due on Monday so I will be fitting it out with insulation and the electrician will make it powered, then I'll be painting it and transferring all my hobby stuff to the shed. Following that there'll be DiY in the vacated back room to make it half decent as a dining room so progress will be even slower but then hopefully the new space will allow me to crack on with things.

In the mean time I've a couple of little WiP posts to whet your whistles but we'll have to see how things progress from there. Stay frosty!

Friday 10 July 2015

Dark Angels - Scouts TO DONE!

I've split these pictures up into two posts for a couple of reasons, one it can be quite daunting to see a page full of stuff and this means you only have to devote a small amount of time over two days compared with twice the amount of time on one day. Also, given how most of my currect enterprises are difficult to show progress I'm better spreading this out a little bit so at least the blog is ticking over, otherwise there'll be nothing to post. Hopefully you don't mind.
I really enjoyed painting these, I know I felt a little impatient at the end but it resulted in a sense of freedom that the rest of the Dark Angels fail to deliver.


I was also wary of painting the guns, the tarnished bronze didn't seem to fit the stealthy hiding in the shadows purpose of snipers but thankfully the verdigris toned down the half-way done brass and bronze elements to actually make them still fit with my theme and not stand out. Anyways, the anacronisms of the grim dark universe means these things could be day-glo and I'd get away with it!


I also made sure that I managed to cover up as many eyes as I could with sniper scopes. I'm all out of patience with them, I can't paint them for toffee. I must have tried about ten times on my Azrael conversion and I'm just about to give up on my Tac Squad sergeant too


But these guys make a nice unit. I wonder if the Space Crusade ones will fit in...?


The sergeant also had a freehand chapter symbol added.


Camo cloaks turned out alright.


I'm really thinking I should do some warpaint on some of my bare headed models but I fear it won't make too much sense, but we'll see.


Glow effects didn't work too well on the visors but I do think the little whit highlight looks like a targetting reticule which just about lifts them from mediocrity.


The sergeants one worked out OK too. I'm really chuffed with the chapter symbol. Sure it's quite patchy and a decal would be tidier, I don't even think it's my best but there's something about the roughness to it that's just right, almost like he painted it himself [badly].


Cloaks blend together well.


The extra highlights on the black may be a little too much but I think it help break up the orange expanse a bit more.


So I'm really chuffed about these, especially as they're seen as 'competitive' now. I'm kind of wishing I took a longer look at what my nephew was selling now as ther was scouts in there. But it's nice to have something done that's going to definitely get used, considering I had zero intention of using them when I started! Anyway, there'll be moar pictures in a day or so but in the mean time a big red stamp! Incidentally I was thinking of doing a green one for the 2015/16 hobby season, alternate red/green each year, what do you think?


Tuesday 7 July 2015

Neon baubles

Whilst on the subject of Christmas baubles, but obviously not 40k related, this is what my son and I made. He painted all the paper balls. I got some metal craft rings, I think they're for lamp shades. Split them and then threaded the 'electrons' on. Then I drilled holes through the bauble, tied the rings together with fishing line and threaded them through the bauble. For added security I super-glued the knots on the rings.


It was actually really easy to do with only the knots being a bit fiddly. I think I also rebuilt it half way through as the idea I had in my head wasn't the easiest solution to build but I'm not sure what was in my mind at the time. Still, just thought I'd share this craft nonsense as the concept was more of what the Mad Mek would call my 'inner Mek' surfacing ;) You never know you could find a use for it.

Make your own Vortex template

I've not really had a need for a Vortex template before, but then the Ravenwing Dark Talon's Rift Cannon was upgraded to give the potential to create one so I suddenly had the urge to get one. Of course they're quite difficult to get hold of and on ebay they're going for about £15! So I wondered about alternative options. I still recall Ron From the Warp's awesome 'Wiffle ball' tutorial but funnily enough it was Rob's tutorial from warhammer 39999 that I remember most. But Wiffle balls don't seem to be easily available in the UK so I got to thinking about other 3" diameter objects


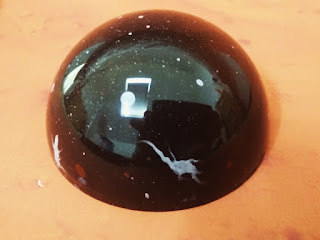
And I already had them! A while back I helped my son make a Neon atom for his physics class and the centre-piece containing the electrons, protons, neutrons [delete as appropriate science folk, I think the electrons are aound the outside?] was a clear plastic Christmas bauble. now I only needed one but my local art/craft store had a pack of 10 and they're just 4mm wider than a standard small blast so I thought I'd have a crack at making my own, so first up I cut off the hanging tab.


Now the difference with these is you can spray them on the inside to retain a super high gloss finish. So I covered my hands in a plastic bag and sprayed above the bauble with white, trying to ensure spots of paints dropped onto the bauble y'know for that spacy look.


And it came out alright, but while I was taking the pictures I missed the opportunity to drag some of the bigger spots with a cocktail stick for some weird warp lightning.


And therefore I sprayed some on some cardboard and tried to paint it on, with limited success and actually picked up some of the Red Oxide undercoat when the solvents managed to melt the primer on the spray box I was using. Still it was a first draft so I didn't mind so much.


I then did the same with the Red Oxide primer to add some nice colour tints to it, like gaseous nebulas and then it was a coat of black spray primer.


And I ended up with this! OK, it's not perfect but Ron took 12 attempts to get happy with his and Rob did three. As I only had the one coloured spray can and paused to take pictures inbetween I was a bit limited but for practically zero cost I'm chuffed with the results especially the high gloss finish, which is the advantage of spraying inside the bauble. Of course you can paint the outside too if you want a matt finish but that'll require a varnish to protect your handiwork.


I did actually put an LED candle inside to see if it would add an unearthly glow in the warp but it was a bit pants, and even worse in the dark as it shone through all the black spray like it wasn't even there!


Anyway, for a 5-10 minute job I'm pretty pleased with the results, so thought I'd share an alternative way to make the Vortex templates

Sunday 5 July 2015

Dark Angels - Scout Camo cloaks colours

Unfortunately [or fortunately depending on your point of view] I didn;t take anymore WiP pics after this. I actually did a few highlights on all the black polygons and then promptly painted all the black bits, green bits, metalics and eveything else but it just doesn't show up in the pics as progress so I didn't even bother.


However, the basis for the pattern is complete in these so you can get the jist until you see the finished article. For some reason though all I'm seeing is a fruit loaf or cake, filled with raisins and orange peel, which isn;t a bad thing I suppose.


I certainly don't think they've been ruined, far from it it's just the feeling I get from them is difficult to articulate thanks to this whole 'cake' motif I'm getting, cos I like cake. Still, I'm glad I did it as otherwise it'd just be some red cloaks. This isn't a new skill, because afterall I did do this 19-20 years ago but it has been something different to do which has made it fresh and exciting.


Hopefully I'll feel equally motivated and excited when I crank out the airbrush and have a pop at some of my tanks. I'll need a little practice first as the last time I used one was probably in '91/'92 at school and I'll tell you the amusing anecdote surrounding those airbrush lessons when I attempt to hone my talents as a little humility of my own might help temper the amusment I'll have at someone else's expense...