Showing posts with label drop pod. Show all posts

Friday 10 February 2017

Dark Angels - Drop Pod[s], Pod 2 playing catch up

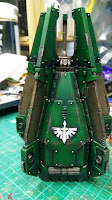
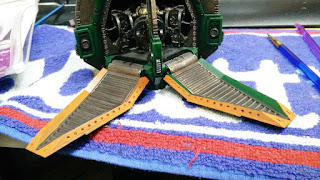
Another quick one, you see, I can paint those holes neatly [or at least neater]. I've pretty, much brought the pod up to the weathering stage now.


Having done all the holes and door edges I also stamped the mumbers on the fins and found a pencil tube to stamp a circle for the company symbol. I've also updated all the markings on the door ready for the final white highlights.


Holes were roughed up, just need two more orange edge highlights, a Soft Tone wash and then all the gun metal bits for scratches.


Progress is swift [unfortunately I appreciate the pics don't really show just how much I've done - caught up in the moment, sorry] with just one more update and then I can get them varnished alongside my completed Genestealer Cult.

Wednesday 1 February 2017

Dark Angels - Drop Pod[s], Pod 1 numbering

Despite feeling confident to leave pod 1 well enough alone I felt the urge to add numbers. The original plan was awesome massive numbers on the door but I threw that idea out the window when the chapter markings looked alright as is. So instead it was numbers on the top fins, but how to make them consistent? Decals were the obvious choice but aside from not having enough vehicle decals to do all five fins I know I can paint that gothic swirly number 5, it's just it tends not to be consistent size wise. So I created a tiny stencil [without the line up the middle]. It took me two goes to cut it out of paper without destroying it.


I managed to do all five of the fins but you can see by the last pic [actually the 5th fin] it was becoming less effective. I'm not sure if this was due to application or dampness in the stencil but I definitely could have taken it down a notch so I didn't go quite as rough as it turned out.


But not to worry, because with the 5 in place I easily neatened it up, which was the plan all along. Ordinarily I'd have pencilled it in first but again it;s about being consistent. I also went round with some Caliban Green on the edge to neaten up any overspill.


Not the same 5 but each number did have subsequent pure white highlights. The end result is consistent across all the fins but hindsight I think it would look much better as a white circle with green 5 in the middle, although I'm sure the 5 would have to be smaller for it to fit and I doubt the stencil would be possible at such scale, extremely difficult to cut at the least.


Anyway, this is what I used, cutting out the five on the top row, although the actually fin shape and measurements are not correct so I had to fudge it a bit in positioning.
 I now have to decide if I'm doing the company symbol on the opposite side of each fin, by which I mean I have [annoyingly] decided to paint the company symbol, I just need a circle stamp on it at the correct size before I then fill it in.


Meanwhile Pod 2 got some love with the door edges orange in just two coats. I now need to do some extra shading and final green highlights.


Monday 30 January 2017

Dark Angels - Drop Pod[s], Pod 1 weathering

I'd had the opportunity to get a good few hours concerted effort in resolving the edges on the doors but moreover I was happy with the result. However, the process wasn't without a new issue in overspill from the orange getting on the green outside of the doors, not to worry though as the doors were to receive some weathering that would potentially hide all my sins [until some Interrogator Chaplain tortured them out of me for his little black pearl].


In the mean time I also finished marking out the symbols on the sides, really quite pleased with the results, just Valejo Stonewall Grey, Army Painter Strong Tone [Agrax], Stonewall Grey and white. Obviously the rivets had also been done, I think I counted 165 are on each pod, add in the 150 holes on each door and it really is the repetition that can kill you with a pod. Regardless you'll notice some additional splodges of paint that got caught on the doors. Once again not to worry as the weathering would cover these up.


Sponge and Rhinox Hide as per Duncan's advice. I tried to be a little bit economical with it this time [compared to the damage on my Aquila Lander], only really catching the edges of the door.


I think both the Aquila and Euronymous suffered from too much weathering, Euronymous I fluff-excused the Aquila made a little more sense as it had crashed afterall but both seemed a little busy and had to be salvaged in one way or another to make me happy with it.


Interestingly the Dark Angel Codex features some painted miniatures that are clearly done at a 'tabletop' standard as opposed to the 'Eavy Metal team standard. As much as I approve of them showcasing a standard that's achievable by all in the Codex I was determined to do something better than the weathering on this at the very least.


So here's my first attempt with the sponge and Gun Metal on the left door.


And then I continued round the model, note where I covered up those paint smudges.


I added a subsequent wash of Strong Tone, just to make it less clean and unrealistic. I didn't go as far as I did with the Aquila and add Typhus Corrosion and then Strong Tone to blend it in as I thought the results were OK by themselves.


Here you can see the doors open and how the sepia wash on the door edges blended the oranges together. Compared with the piece of the crashed Aquila you can also see that the orange almost looks like my Ferron Proxima Red Planet Basing, unsurprising given the similar colours and yet unintentional. However, the result is most welcome and once again ties things together.


The fact is the pods, Aquila Lander and Euronymous run a fine line between process, effect and consistency. There have been slight deviations in process - choices in green and weathering that are completely different. The effects and how they’re consistent across the army was always a concern, not helped by the pod being started before I went all Verdigris Bronze on everything. And yet the inconsistencies are still valid as in reality not all materials are made at the same time so there will be differences in colours, some armour will be scuffed and reveal an undercoat, some will reveal bare metal. Some metals will be steel, some will be bronze etc.

I think 100% colour matching is really effective and I’d love to have that but for the most part my nids deliver on this front. As much as I’d be happier for the Dark Angels, who I consider rightly or wrongly, to be the army I put more effort into; they’re also the army I agonise over more intensely so I have to take success where I can find it. There’s little left to do on this, I considered litany markings before the damage but wanted it left without extra paint breaking up the strong green. There are some yellow pipes inside that I also don’t think should be black and yellow striped. They’re so small breaking them up with black would disturb their ‘silhouette’ in the model. There's quite a few more details I could pick out but I need to remind myself this is just a pod, I’ve another one to do and this is pretty much better than I expected anyways. So, it just needs varnishing and some of the dials/radar need Tamiya Clear Orange X-26 and it’s done…

Friday 27 January 2017

Dark Angels - Drop Pod[s], no seriously!

One of the reasons why the drop pod was put to one side involved the doors. The standard is usually to put yellow and black chevrons done the side/inside and although I love a good chevron [yellow and black in particular] this was never what I wanted. Orange was my plan but having put the orange down the side I panicked and tried it inside as well. When I say panicked I mean I had a thought to photograph it and then Photoshop the extra orange on the inside and ask everyone's opinion but when I cam to do a successive coat of orange I just started painting the inside regardless [covering up the blended green I'd painstakingly done already].


But you see this was the inspiration for the orange [although they also did it in BR Green and yellow] so in some respects the original plan of just the side of the door was the right one.


So with the Aberrants out of the way and the Primus and Magus running out of steam it was time to look back at the pods. First step was to take a slightly different Craft Acrylic orange and run it along the bottom of the strip. I thought this would make it shade from bottom to top as my Valejo Fiery Orange was going to be on the edge. Then I carefully filled in all the 150 holes that are for the explosive bolts holding the doors shut.


But the intention was always to show the scorch residue from the bolts and the subsequent 'splotches' just didn't sit right and I was contemplating repainting the orange again [which had taken about 4 coats to get this far] and redoing the holes neatly.


I have a rule that if something doesn't look right then it usually isn't and as much as I wanted to show scorching what I had created was just 'untidy', like I'd tried to be neat but failed abysmally. You can also see the 'darker' orange didn't look darker, but more a hue shift so I was becoming frustrated and very early in the process of trying to finish this for good.


One last hope was to apply some silve to the edges, just to try and convince the viewer the scorch was intentional. Realism potentially out of the window, how do you get exposed metal and soot damage at the same time [you probably can but it didn't seem right in my head]? 


But the result was pretty OK and I thought it was good enough to save me from resetting the edges, both bad for progress and morale.


I also added some washes to the edge, not as apparent in the pics as it's ended up. Sepia all over and some Nuln Oil on all the holes to try and blend that 'soot'. Grunging it up saved it completely and you'll see how good it's become, blending the two orange hues together.


So I'm now really pleased with the result, it may not be the crisp clean orange of the Aston but the end result is something so much more and much mor ein keeping with what I've done in the army already. With this hurdle over it was full steam ahead and it looks like it's almost the home straight.

Monday 9 January 2017

Dark Angels - Drop Pod[s]

As the motivation begins to kick back in I decided to crack on with the drop pods. I'd tried the Green Glaze on one of the fins to compare it with my Vallejo Angel Green, the fact was there was very little difference. It went on OK but the Angel Green was blending the Caliban and Waaargh Flesh a little better, it is a pant afterall and not a glaze.


So I upped and decided to go Angel Green all over and it was much better than the first application. So now I need to do some edge highlights and then it'll be [a whole lot of] detail work and any battle damage I decide to do.


Meanwhile Pod 2 is ready for it's Waaargh Flesh highlights, even if I do like it pretty much as is :( Still, trust in the plan.


Once pod 1 has been highlighted I'll spend my efforts bringing this pod up-to-date so they can progress together again.


I think I'm back on track again with these, I just have to ensure I don't flit to something else so that the 'fires of motivation' don't go out or 'strike while the iron is hot'. But I'm getting there and it is progress so that's a win.

Tuesday 20 December 2016

Dark Angels - Drop Pod[s]

Progress is very difficult to showcase at the moment, n top of that I’ve been preoccupied with the seasonal madness, the prospective new job interview [no word yet on how it went down] and just general fatigue from being anxious about what a new job could mean and then nervous for a week about getting the interview. Anyway, it’s all done now and after it I ‘crashed’ [metaphorically] with fatigue and a tension headache. I’ll either get it or I won’t, there’s nothing I can do now.

However, I did crack on a bit with my current projects, applied some Warplock Bronze to the Assault squad and more importantly advance the second drop pod with it’s first set of highlights and bronze effects. You can see there's a subtle difference in the bronze effect but nothing I can’t live with. Also noticeable is the pod 1 fin that’s been ‘glazed’ with the Valejo Dark Green I have. It’s certainly more vibrant but it seems to have left an uneven effect so I’m a little disheartened by the result. I’ll be looking to get the green Citadel glaze to see if that gives a better result.


Funny thing is I think pod 2 looks OK without the Waargh Flesh Highlights of pod 1. Hopefully that Waywatcher Green will even things out when I get it, fingers crossed. Otherwise I'll be adding far more re-entry/battle damage than I'd originally planned.


While I was in limbo I thought I might as well crack on with central console radar dome [thingy]. Obviously painting a perfect circle can be quite hard, but not if you use a tube to stamp it on [this was a Calpol syringe plunger, the perfect size]. Now this was a fab first attempt, just far too sharp for what needed to be a diffuse glow.


Obviously my subsequent attempts to blend the effect wouldn’t be nearly as good, but it all came out alright in the end. I'll probably still Tamiya Clear Orange X-26 it which will blend things a bit further.


So stuff is happening, just difficult to share because it doesn't seem like much. Anyway, don't forget the Birthday Bash, I know Christmas is still hectic but should you get any Crimbo funds, set aside some of it to join us in Feb, we've already seen quite an interest :) www.wargamesuk.co.uk/events


Wednesday 7 December 2016

Dark Angels - Drop Pod[s]

NOTE: For reasons I cannot fathom, all the pics have been deleted from Google photos and a recent image purge on my phone [maybe thats the connection] has resulted in their removal. I've found some lo-res cached copeis but I'll try and find the hi res versions, in the mean time I appreciate this doesn't look good and sorry for the cock up. 
UPDATE: Found I'd set an automated sync to a cloud storage site I'd forgotten about and managed to reupload the hires versions...

I'm not sure if I was otherwise affected by Rory Priest's last comment on the drop pods:
"I do think they should really be approached in ones from what I have heard/read."
But as it was I did stall for a while on this, it's odd really as the process is highly predictable and although I can't say I feel the need to gnaw my own face off as I would a dozen Genestealers there is something emotionally null about it. I don't dread it or fear it but it just fills me with no pleasure whatsoever as I finish shading the inner parts of the fins.


The other sides have also been done but I now need to find a way to blend the colours, the highlight is too olive looking. Usually I use my Dark Angel green Valejo paint, if it's not shaken it has a semi-opaque glaze quality that will help blend the stippled highlights and enrich the darker greens. I'm a little hesitant though as I fear it may obscure the black shading, part of me wants to get the Citadel Green Glaze to achieve the same result and be more consistent so I'm waiting for my next opportunity to get some.


In the mean time I went on to highlight the doors. The stippling is not looking great at this stage. From experience I would have applied the £1 craft acrylic to simulate a rougher cast surface that would have meant my stippling would pick up the extra detail and not need to be so perfect, like my Imperial Knights.


Unfortunately this had already progressed so far I didn't want to go back to such an early stage and with the knights they had another coat of spray over the top to try to seal the art paint onto the model. Now I had to decide about the black shading on the doors and how to apply it. Then I'll be at the same crossroads as the fins for blending the greens.


Therefore with decisions to be made I moved onto pod number 2. Hopefully while I focus elsewhere a decision can percolate in the back of my mind while my efforts are more productive elsewhere. So I move onto the bronze, can I recreate the success of the original?


I manage to get the Gehenna Gold and Brass Scorpion on. The stippling is a bit more chunky than pod 1, less realistic but I don't think it's any worse for it. I've some sepia washes to do next to deepen the tones and then I can work on the greens and sync pod 1 and 2 together in the process.


This was a long slog to get here but I did flip between a number of projects, projects that I don;t want to be working on as the pods are the primary goal; but they're all on the list I just don't want to get sidetracked from the next thing I have planned after the pods. I fear I may get too attached to the things I'm doing to keep my mojo up and not get back to the next big thing I'm hoping to do. That said I'll still be sharing the supplementary efforts over the next few days, lots of exciting things after a period of seeming inactivity.