Monday 29 September 2014

Terrain is everything - Hail the Omnissiah a new Print & Play building


It's been a good few months since my last   'Print & Play' terrain template so it was about time I added the wide version of the green marble building. If you've made the first beige or black building then it's exactly the sayellow grid leaded effect. So the building is the same, but wider with just a different colour for variety on your battlefield.

These would ideally be suited for foamboard that has the black foam core. I was going to make one but didn't get round to it, sorry. However, that black foam would make these easily playable from the off, without looking too much like a quickly knocked up bit of terrain.

To access the full STC please point your Cogitators here, be fair warned it is 13.5MB in size [I make no apologies for this, I could probably render it as a .jpg or spend hours trying to reduce the file size, I tweaked it a little bit and got it down so hopefully it's less of an issue now.]:

https://drive.google.com/file/d/0B97Rk-BalgZbczZQZ2FuTjNlUVk

Alternatively if you want to reduce the footprint a bit and still retain some of the proportions you could employ the standard 2 storey template on one facing to make a rectangular building instead of a square one. It's your choice but here's another 'artists' rendering and a link to the page where it's at.


Friday 26 September 2014

Terrain is everything - Project Ω - Realm of Battle board.

And now you can see why there were no teaser pictures for this project. There's no picture I could take that wouldn't reveal what this was. Anyway, I was really lucky because I'd been planning to pick one up for a while and then one appeared on eBay, collection only but in Manchester. Working there and with a colleague who was prepared to pick it up gave me options. In the end the seller brought it in on the train as I work right next to the station. 

Now I do regret the fact I didn't make my own but Liam, Ben and Otty have the official GW boards so I felt it prudent to have something that would sync up with them. Of course winning it at auction for £70 certainly eases my conscience a bit! I'd sat on the auction, put in a bid well above that knowing full well what one costs in the real world and it ticked over onto £70 from about £68 and no one else bid, I couldn't believe it. Gotta love that adrenaline rush when you're expecting ebay snipers!


Of course the loft conversion has meant its been stored at work for the last six weeks but I finally got chance to bring it home. In that time I've thought long and hard about how I was going to paint it and one thing I wanted to do was add a little more texture to the surface so I could get a more interesting effect. I thought about adding PVA and flock like my Armies on Parade board but decided it was too rough. Eventually I decided to use PlastiKote Stone effect spray paint. I hoped this would add the texture but bond effectively before being covered in Red Oxide Primer.


So first up was masking all the skulls. Yeah I know they're almost universally disliked but I can live with them.


I'm considering making all the bone pits as Digestion pits. I'm worried the lime green will be a little overwhelming though, don't know whether to go with yellow ones like my original digestion pit, opinions welcome.


I was actually quite surprised how much texture is on the boards already but I still wasn't sure how it would drybrush for me. I've obviously seen lots of them and play on them regularly but I wanted a finer texture and I also hoped it would help mitigate all those figures that slide down the hills.


So here's the final spray. If I'm honest I'm worried the texture won't actually bond to the plastic. It may have bonded better if there was a primer on first but hindsight is always 20:20. Certainly by the end of the day it was still moist to the touch with nearly 12 hours of drying...


I got through the whole can and it does say thin multiple layers work better than thick ones. Well you can see the coverage isn't complete so it's certainly thin enough in some places, it's just the thicker areas I'm concerned with.


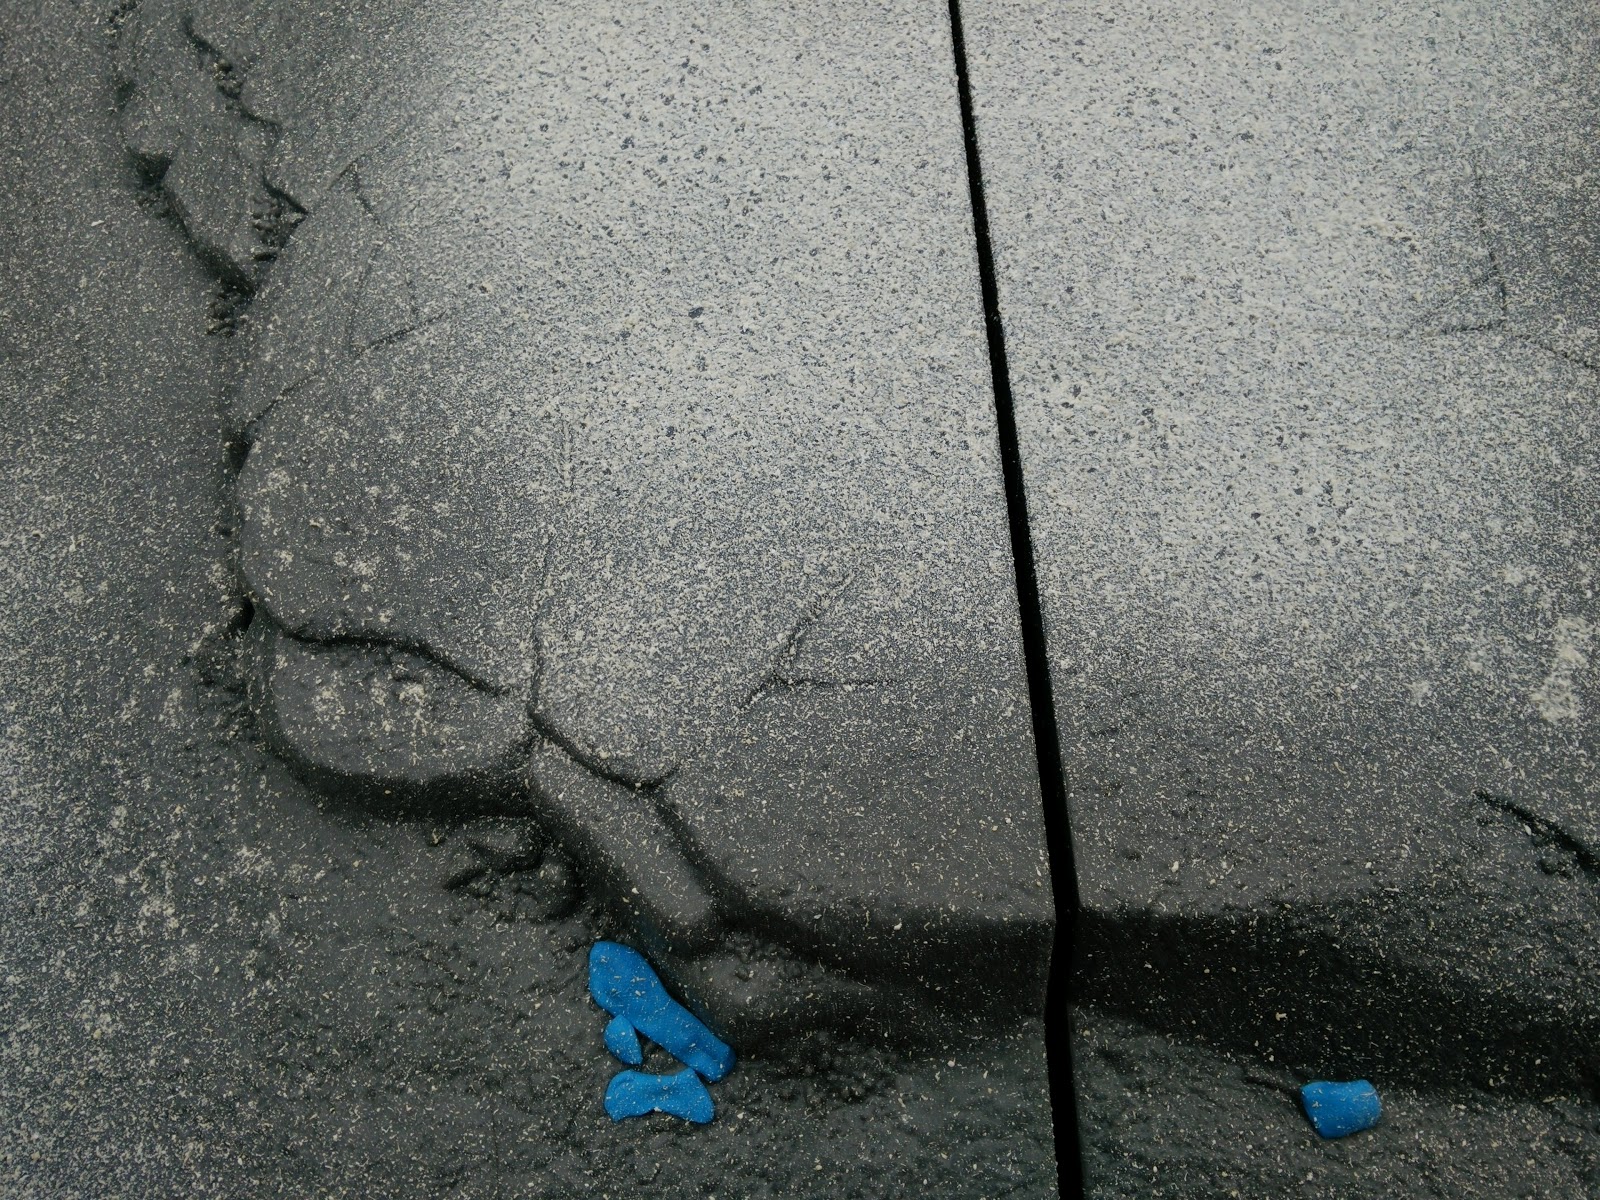
Afterwards I removed the generic sticky tack with the interesting result that whatever propellant/varnish is used to try to seal the texture to the board made the tack become ultra soft and sticky. I had bright blue tack all over my fingers, not good when I was about to start painting our new bathroom white!


Hopefully you can make out some of the added texture, I also did a final spray from about 2 foot away which resulted in those large spots, at the top middle and left. Some nice variety I think. Havign removed the tack I then ran a cocktail stick along all the cracks just to ensure they were not disguised by the texture paint.


Can't wait to add the Red Oxide Primer, I've got one and a bit cans, with another on order. I'll do a light coat all over with the cans in stock and then finish it up with the new one so I don't end up with four boards in one colour and the last two in another.


A final note is that right about the the time this was bought the new Imperial Sector Battle Board came out. Of course I was very interested in this but aside from the ridiculous low price I managed to get my Battle Board I didn't go with the City one for a number of reasons. It's not as versatile for one thing, there are only a couple of tiles and there are no variations in height. You pay a premium for the detail and although it's lighter and more compact I just think it's style over substance. If  there had have been some raised plazas or a dais, nothing they haven't already tried on the Forgeworld boards, it may have been different. There's plenty of examples in the Dawn of War video games they could have referenced and they could have found a way to have it positioned in a variety of ways just like this board. Such a missed opportunity in my book.

Wednesday 24 September 2014

Blog Wars 8 - The Reckoning


Alex at From the Fang has finally got round to releasing tickets for Blog Wars 8 so I've got in there sharpish and booked a ticket. PeteB is also interested but his transition from Eldar to Space Wolves means he may not have a fully painted force by November 8th in which case he may just come along for the experience.

However, I have persuaded both Ben and Liam to join in. Liam's got his ticket and will be 'forced' to play with his Dark Eldar. they're absolutely stunning, one of my favorite armies of his to look at that is. Playing against them is a frikkin nightmare.


And Ben will be taking his Necrons. The list building rules for BW8 are a little unique and certainly not without quite a few limitations. This has forced us all to be economical with our army choices and hence Liam's Dark Eldar and Ben's old standbys being dusted off.


I will of course be taking my nids, for their third outing at Blog Wars [hopefully the Dark Angels will be ready for Blog Wars 9]. I will definitely be taking my Skyshield, it means I won't get a Quad Gun, so I'll struggle a bit with anti-air but I did promise Alex I would take it seeing as it didn't get a run out last time. I'm struggling a bit with my list because there is only one Combined Arms Detachment allowed and you must take a Special Character, unfortunately most of the nids are HQ choices so that means I lose a second Winged Tyrant to replace it with Deathleaper :( I can't even add a Leviathan data slate as Formations aren't allowed [I could have taken the Deathleaper Assassin Squad, although the Special Character has to be in your CAD...]. 

It's quite frustrating really, but I'm in full support of Alex running it this way, it's his tournament and he has to run it as he sees fit and by the looks of it keeping track of all the possibilities in 7th is a nightmare so why shouldn't he make it simpler. However, 7th is an embarrassment of riches and it's a bit tough to go back to 'meat and two veg' after haute cuisine! Still it means being creative and I may run a few interesting oldies but goodies for the giggles. On the plus side I am going to get a Deathleaper model so I'm no longer using Death as my proxy ;) Of course that means I have to paint him and he's not on my list :(

Monday 22 September 2014

'nids part 153 - Project Z?! Gets some fixing

With hobby time at a minimum thanks to my home improvements any progress is good news, although if I'm honest this is very little at all. It needs doing though. Project Z is requiring a lot of remedial action to fix certain elements together and cover other gaps. I'm not entirely certain I'm doing a good job of making it any better, clearly my patchwork of Milliput and Liquid Green Stuff is not doing it any favours.


Hopefully the paint job will hide a multitude of sins but I can still do a bit of sanding to try and eliminate some of the obvious seams. Stupidly I haven't even washed this model yet. I think once that happens I'll be able to move on with some more construction work...


...and reveal this beast in it's entirety.

Oh yeah, and with the extra Milliput I mixed up I managed to start another thing on my To Do List:
Tyranid Bastion Crater. All I was really doing was reinforced the mounting card edges and a couple of tentacles. I will be adding some large chitinous plates at some point, and some suitably gross fleshy bits to show where the ruptured Bastion once stood. It'll also make a decent bit of terrain, hopefully.


Friday 19 September 2014

'nids part 152 - MOAR Genestealers!

Apologies again for the micro-blog but by now you know the reasons. Things are moving forwards but not in a productive sense. Instead I'm just 'pushing peas around on my plate'. What i have done is get the Genestealers dipped ready for eventual painting. I have 11 of the new Stealers I won on ebay, they're the ones on the left alongside the 10 my Kendo buddy Tom Widdows surprised me with.


You can also see that after four or five years I finally decided to get some new Dettol. I'll strip these with a toothbrush in a few days.


And then transfer these from their inky black bath into a fresh Dettol one. I've had them in there for a month now but the Dettol has become saturated with past paints and the original Behemoth colouring has done no favours. Essentially they'reall covered by thin slime akin to used motor oil. I'm hoping fresh Dettol will strip them a little more and failing that a burst of Fairy Power Spray will make them acceptable.


I'm actually looking forward to adding some extra bits to all these Stealers. I'd question why I was doing this, they're not on my list and with my only recent success with Stealers being the Maufactorum brood, which I have sufficient models for this is really a pointless exercise. I do like the idea of having a full Manufactorum and Broodlord Hunting Pack. It's not a list that I think I could take but it is interesting and then I could add my Genestealer Cultists, By no means is this about making a Genestealer Cult army but it certainly makes it viable, even if gaming wise it wouldn't be.

Wednesday 17 September 2014

Nagash, Supreme Lord of the Undead

What's this? No I havent lost the plot, this is still 40kaddict, I haven't gone all fantasy about the big hatted bonehead model that just came out. What has happened is that in all the upheaval with the loft conversion a relic copy of White Dwarf [WD173], that had been in my bedroom for months that I repeatedly overlooked, suddenly became very relevant. This particular issue was the release of the new Undead and has all sort of decriptions of the key characters and locales. So I decided it would make a nice micro-blog as I really have no other content at the moment. So I give you the early art for Nagash


And also a short story. I'm not sure if this content will still exist within the current issue, I doubt the artwork will considering the new modle is so wildly different [but still with a big hat]. So it should be interesting to those who play fantasy and were blissfully unaware of these humble origins. Although it should interest us Grey Beards too with a whimsical look back 20 years ago.


There'll be a couple of other elements I'll share from this issue later that should be of mild interest to you all, at least, I think they will be. Till then i hope this is 'alwight'!


Monday 15 September 2014

Blood Bowl - Elves Progress

With so much going on at home it's been quite restrictive for hobby activity. I was sat there with a curtain pinned to the roof of our 'den' trying to keep out the dust from the building work but I would still see clouds billowing up from the 12" gap between the hanging drapes and the floor. So I boxed up most of the stuff on my hobby table and covered the remainder with a plastic bag. Meanwhile I thought the Blood Bowl Elves are actually quite near to being finished. I only had the bases, skin highlights, orange highlights eyes, hair and any little details to do and they were done. The hair and bases alone were the biggies so I set to...


The brown planet basing is very much similar to my red planet basing, just replace Vermilion with Burnt Umber. At this stage I'd washed them and already put the first highlight on. It's not so much of a drybush as wet brush/polish. The artists acrylics are designed for painting on canvas so when you try and put them on tiny gravel the opacity is minimal. It becomes more like a tint than paint, the more you work the drybrush the more paint actually gets removed!


Of course that encourages you to load more paint on which can spoil the effect so the best bet is to re-highlight with the same Burnt Umber upon completion of the first set of highlights. Successive coats bring out the true colour and provide the hoped for effect.


I then mixed in some Bonewhite to make it lighter for the highlights. I also added the orange highlights on the towels, some more highlights on the black armour with white spotlights in certain areas where light would catch.


Once again I do this mainly around the edges. It helps mitigate drybrushing brown on the already painted miniature and adds a shadow area under the model for a small element of realism and means the contrast between the model and the area he's standing in is greater and thus enhances it - or so I keep telling myself.


So next up skin and eyes and picking out the Bonewhite chips on the bases. You may have notices I'm also painting a Frank N' Stein star player, and a referee, just for giggles. There's the purple haired catcher, who is a legacy painted model, I may add him as a Star Player too, hence the purple hair. I also have a kicker who is not even undercoated and a Treeman who hasn't even been bought. I'm actually looking at this guy from Willy Miniatures


But I also like this one from Reaper, which is half the price :) and twice the size :) but probably completely impractical for game play :( which is a shame as although it isn't as appropriate as the Willy model I really like it.


Other than that there are quite a lot of options but I'm not enamoured by most of them and some are ridiculously expensive for something worse looking than these two options. Anyhoo, "game on!"