Wednesday 30 June 2021

Dark Angels - Deathwing Land Raider Redeemer - Decals & dust

Afternoon #warmongers and #warhammercommunity I'm #paintingwarhammer on my Dark Angels Deathwing Land Raider Redeemer. Mistakes were made... My Xerox Laser Printer did not like the decal paper!


Luckily, I filled half the sheet with duplicate scripts and numbers and those at the top, above the wrecked ones, although slightly creased, were usable. I hoped that once they were floated off the backing paper all those ripples would disappear.


And I was right! The gloss varnish really helped blend the decal in. I did need to scrap one big number 1, as the tail got folded underneath and was irretrievable. The 1 was printed only as an outline, all that black was filled in with paint afterwards 😎 


The script came out really well though and I'm absolutely overjoyed how I got to blend it in, with no sign of the dreaded decal halo. Where possible I try to avoid straight edges and corners as your eye is drawn to those anyway. The decal paper itself helped because it was very thin, almost like a slightly thicker clingfilm in a way, hence why I had to scrap the first big 1. So, the fiddliness of application is outweighed by the supreme finish.


 I also added the AdMech banner decal from the Imperial Knight sheet. I don't know why it felt like it needed something. I some handwritten script might have been nice here instead, but nevermind. I also applied a coat of Lahmian Medium over the decals. I am going to highlight the black in some places, that may be a mistake but OCD demands I do it.


The Deathwing symbol also needs some unnecessary highlights and shading. 


I'm really pleased with how it looks. You may also spot I started changing the hatch lenses to green.


And a very subtle highlight on the 1, using Incubi Darkness. I don't know what possesses me sometimes. When I apply the matt varnish sometimes you can see the uneven matting agent instead of it being pure flat black. Here I've applied the highlight in such a way as to replicate it. Now of course I could go back in and paint it all black, but I fear it'll just add texture to it and make it worse. Hatch lenses have also been highlighted.


The Deathwing symbol is a little bit better. I also added some tiny highlights on the illuminated capital H. Incredibly subtle but really helps lift that bevelled effect in the letter. You'll see it better on the TO DONE pics.


And here we go with weathering. As with everything I do this required significant internal debate. Despite already having my Ravenwing with weathering powders to simulate the red planet dust of Ferron Proxima kicked up I feared this would look like rust. But technically it should, as Ferron Proxima is essentially just a giant planet of rust powder. So I have a precedent that works and still debated doing this, but it looks great.


I didn't go overboard on the bottom, just enough to give a taste of the orange.


This is of course pre-varnish and some of it will disperse once it's covered. I may add in some extra Vallejo Rust Model Wash & powder in some of those exposed footwells. The tracks themselves could do with more, but they'll definitely need extra varnish as they'll be where the most game wear takes place. I also don't want powder smudges left on other people's gaming table [should I ever game again!].


After the varnish, just some gloss on the lenses, I will not be using Tamiya Clear on all of them, on the advice of commenters. I may be a little selective, the hatch lenses and the lights - yes, targeting lenses - no. And then it is TO DONE!

Monday 28 June 2021

Dark Angels - Deathwing Land Raider Redeemer - Decal prep

Afternoon #warmongers and #warhammercommunity I'm still #paintingwarhammer on my Dark Angels Deathwing Land Raider Redeemer. I know I said it would be a while before an update, I suppose it has, but I've been prepping the decals. But, before that i actually painted one of the company numbers on the front wing, plus some paint scuffs. It's not too bad for freehand.


Here's the Photoshop mock-up again - slimmer, taller but I think I did an OK job, considering.


I was preparing the numeral on top too and the litany. I got confirmation this is the correct orientation from Nick Bayton.


I stretched the number 1 even more for the top down view, but viewing at an angle will foreshorten it. I also added the Deathwing symbol to the litany.


I did a mock-up of the track guards to try to work out what size would fit in the space available. This meant the litany could be scaled to fit 15mm wide. This is much better than the original 12mm version I started with. A 25% increase in scale really helps and the mock-up also allowed me to see that the Deathwing symbol just needed to be nudged off-centre due to the trapezium shaped light mount. It will also help me position the decals as there are points of reference on the mock-up I can use to align them.


I'll make these available as a .pdf should anyone want them

Friday 25 June 2021

Dark Angels - Ravenwing Black Knights - Big Build TO DONE!

Afternoon #warmongers and #warhammercommunity I've been converting some Ravenwing bikers into Ravenwing Black Knights, similar to what I did 4 years ago.


These are just the basic bikes, but with a Ravenwing upgrade sprue and some of the extra robed figures I was able to kit three bikes out as slightly more 'fancy' than the standard bikers.


Obviously the Plasma Talons are the hard part of the conversion. These are achieved using extra Plasma Pistols. I don't even worry about the bolter 'magazine' [or the fact those two pistols are actually slightly different sizes]. When it's painted and slightly canted over to the side it will hardly be noticeable.


I had one spare Corvus Hammer, shame I couldn't show it off a bit more in its pose. However, having sticky out bits is a recipe for it snapping off or not fitting in a figure case. I was actually going to mount back pack decorations on all three but scotched the idea for this very reason.


I also press-molded a Corvus Hammer. It is rough as hell, but I'm hoping paint will cover up some of the deficiencies. For some reason I thought as this one could be kept separate it would be easier to paint. We'll see if my theory is right


His bike, plus the Space Wolf Plasma Pistols, which look vaguely chaotic with their spikes. It's funny how that context is changed from the savage animalism of the Space Wolves, to the traitorous Fallen of the Dark Angels.


Anyway, I get Big Build Great Big Granite Base Stamp of Approval for this and I've some more Ravenwing to add soon.

Wednesday 23 June 2021

Dark Angels - Ravenwing Talonmaster - basecolours

Afternoon #warmongers and #warhammercommunity Alongside my Macragge Tactical Squad I've been #paintingwarhammer on my Ravenwing Talonmaster. The metals were finished in conjunction, that Army Painter Strong Tone taking that bronze to a proper aged look in places.


Perhaps too much? But the blessed verdigris will obfuscate things a bit - hide issues, fill in discrepancies. It's a great leveller, I'm not even too proud to suggest it isn't a crutch. But it is more than just that. It adds as well as hides for so little effort.


That relic banner will be a constant annoyance, I have no doubt. It's very fragile and precarious, I suspect it'll snap off repeatedly. I'll have to find a gentle way to transport it. All of the black has been recovered, reds and I'm going to work on the cockpit next.


The irony of doing this, is I wish I was doing more of them. I really like the little compactness of them - the new speeders are just too big. Saying that I'm certain to do more than just this one would probably kill my motivation dead.


What I could do is get those Ravenwing attack bikes ready to prime and then they could waiting in the wings should I still have a Ravenwing itch once this is complete.


It does annoy me that I tried really hard to keep this model as tight as possible, to prevent gaps in the kit, but those angled edges around the cockpit are awful! I should have tried a little harder to smooth them over...


I think I'm feeling the urge to try and rectify that somehow, even if it is a step back I should be happier with the finish before I go on and paint the rest of the model. We'll see.

Monday 21 June 2021

Dark Angels - Macragge Tactical Squad - Shading

Afternoon #warmongers and #warhammercommunity I've been #paintingwarhammer this Macragge tactical squad. A quick one, but not necessarily quick to get here. After the last post I added the next set of highlights on all the metallics. I also cleaned up some of the green and added red where it needed to be.


Now in most GW tutorials they might have advised and additional coat of Caliban green on all the respective areas but I was adding load of black shade wash so it didn't need to be perfect. I'll be cutting back in with green highlights anyway.


Once that's done I'll also be blending in the darkest areas with black. I say blend, it's just thinned down black that I can easily fade, with some drybrushing in places - did you ever notice you don't get the chalky effect drybrushing black? Worth thinking about for those ultra dark colours.


Note the additional purity seal on the back of the squad leader. The back pack has a load of glue on that banner and a lot of the detail has been obscured. I thought an extra purity seal might just cover up the mess. 


Unfortunately the worst of it is on the front of the backpack, but there just isn't room for another seal to hide things. Hopefully the banner itself will proved a better focus point and maybe the blessed verdigris will hide the rest of it...


Slow but steady progress. Green highlights will be a challenge. If I can set a goal four highlighted in a night that will help me reconcile the remaining tasks. Even so this is far quicker than I expected. I genuinely feared I wouldn't get these done but I'm about a third the way through, here's roughly what's left:
  • Marines bronze
  • Marines blessed verdigris
  • Marines green
  • Marines eyes
  • Marines freehand symbol
  • Marines freehand knees
  • Marines leather pouches
  • Marines purity seals
  • Marines odds & sods
  • Marine face
  • Marine banner
  • Marines bases
  • Marines varnish

Friday 18 June 2021

Dark Angels - Macragge Tactical Squad - Metallics

Afternoon #warmongers and #warhammercommunity I've been #paintingwarhammer this Macragge tactical squad. It's funny how coming to the conclusion that these are my priority can overcome the perceived obstacles they face. I've gone on record numerous times about how I find my own brassy bronze recipe a challenge.


I don't know why that is and I don't know why I persist in following the same process knowing full well it can sap my motivation. Thankfully, this is not currently the case and coming to terms with the task had meant I've got the Army Painter Rough Iron [Warplock Bronze] on.


I would normally follow up with Balthasar Gold but it had run our and I used VGC Hammered Copper instead. It is indeed slightly more copper coloured [reddish] than the Citadel paint.


However, as you can see Retributor Gold on top and the forthcoming additional highlight, wash and blessed verdigris will blend/obscure the slightly warmer tone of the VGC paint.


While I was at it I started one of the Aegis Defence Line gun emplacements. It's missing the additional textures I've previously applied to the ADL, Bastions and other terrain elements


But I just wanted to get going and not faff about. I've actually got a couple more of these and the las-cannon turrets to do. If this goes well as is I'll follow up on them. If it feel lacking I'll ensure they get that extra texture.


As I was doing metals, it made sense to do the same on the Talonmaster


Can't wait to get onto tidying all these up. I have an overwhelming belief they'll take much less time than I imagine. I want to be pleasantly surprised, perhaps bottle that feeling and get some other Ravenwing built and prepped and jump onto them too. I have 3 attack bikes afterall and 3 bikes I was going to convert to be Black Knights too.


The extra weapons, master and gunner also got done, but I didn't take pictures. I have this feeling of absolute hobby satisfaction - my mojo is up, I'm motivated and willing I just need time to capitalise on that energy.

Wednesday 16 June 2021

Blood Bowl - Halfling Team - Crackling

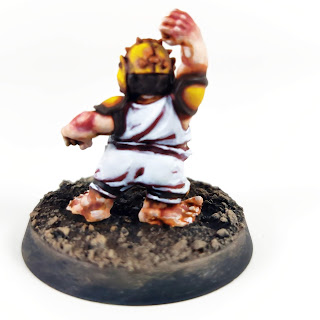
Afternoon #warmongers and #warhammercommunity I've done a bit more #paintingwarhammer on my Halfling #BloodBowl team. I know I just said I had other stuff to focus on but that was a conclusion I came to as I was doing this. This was a big step - covering the red basecoat in white in readiness for the fluoro pink.


Weird in a way because I liked the red, but also the white looks pretty cool too.


And big jump here. The fluoro pink went on and it's been highlighted a couple of times [mixing in white]. The weather turned very warm so the paint was drying quite rapidly


I also added some Army Painter Skeleton bone pinstripes, but felt they need defining a bit more, hence the additional Khorne Red 'drop-shadow'. I've added some Bloodletter glaze in the recesses and highlighted all the tops of creases to get extra definition.


I added the criss-cross of the crackling pattern on the helmet and shoulder pads. It's frustrating in a way as when I did it on my original models decades ago I was actually neater. I tried adding the Skeleton Bone for more definition, still to add the cloves, although the helmet studs suffice there. That said the criss-cross pattern is all over the shop on the helmet, so I'm a little underwhelmed.


While I was at it I did some of the same crackling bits on this Hefty - shoulder pads, helmet, highlighted the skin and did the eye.


Cloves will be in the centre of the criss-cross I see examples where they're placed both in the centre of the square and at the juncture of the cuts.


This helmet is the most representative of a ham, but the shoulder pads - I'm kicking myself at the difference in size of the patterns :(


The catcher also got crackled and a first set of highlights, and his eyes, slightly skew-whiff but passable. I need to work out how to do a flushed complexion on a dark skintone next.


I also remembered to make his palms and soles of his feet lighter skinned. It's a small detail that I believe can be overlooked and as I continue to explore varied skintones it was worth doing. One thin coat on the palm of his hand already looks quite effective.


I have to admit I'm not quite as pleased as I hoped to be with the pink, or the crackling for that matter. I'm pretty sure that the varnish will tone things down, it's currently a bit glossy in places which makes it odd. I think the pinstripes really help the model, but overall it is very, very busy and the crackling pattern is all over the place - which is where most of my disappointment lies.

Half the team will have brown shoulder trim, the other half orange to make the crackling effect bolder. I want to get these three completed, perhaps do the orange basecoats on all the rest... but now I want to get all the metallics done on my tactical squad too - time and motivation [plus cooler working conditions] please!