Showing posts with label terrain. Show all posts

Saturday 18 December 2021

Terrain is everything - TT Combat Gothic Ruins MDF kit - Red ruined walls.

Afternoon #warmongers and #warhammercommunity I've been #paintingwarhammer on my TT Combat Gothic Ruins. First up some simple first stage Red Planet BASE highlights all over - stippled/drybrushed on.


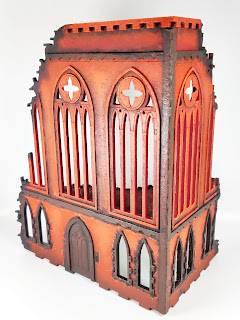
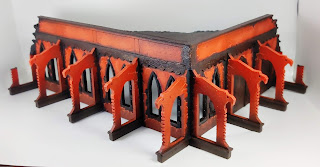
The advantage for having the same colour for your buildings as your battlefield is you have this technique and all it's colours ready to hand [although when I run out of the Home & Bargains Vermillion I'm stuffed!].


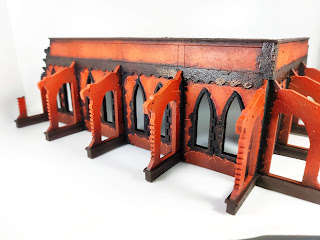
You can see I added some shading around the windows to make it look like the top rendering had fractured off round the window frames. I then added highlights to the cracks, just the same as my House Raven Imperial Knights - yet more transferrable skills!


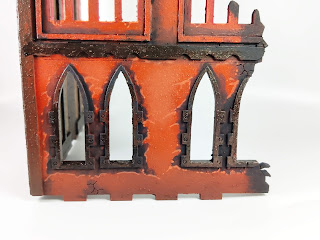
I shaded the edges of the ruins with black - where they might have been damage by fire and smoke.


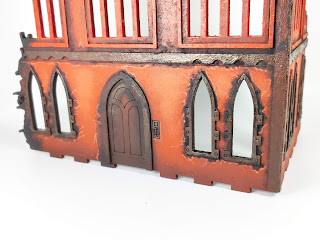
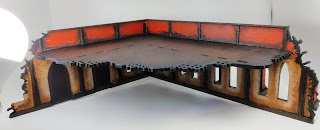
Inside I'd stippled on more Burnt Umber on the cream walls to give a grungy grimdark finish. 

On my Sanctum Imperialis I went on to add some bone highlights to tone this brown grime down, but I deliberately decided to leave this as is for a few reasons. Ordinarily I get to this stage and wish I could leave it but feel compelled to carry on painting, so for once I refused to be a slave to my compulsions. Also, it's quicker to leave it as is and as much as I like this terrain a quicker more slap-dash approach is fine.


Additionally, it would be useful to have something that didn't go all the way to the degree I did on the Sanctum Imperialis, just as a measure to compare when I do.


That's not to say I've rushed this, far from it. I thought I'd be really quick with it but I did far too much detail than I wanted to.


In my defence I always add far too much detail but I had hoped to fly through these and not worry but I think I settled somewhere inbetween, and this is just before the Blessed Verdigris was to be added!


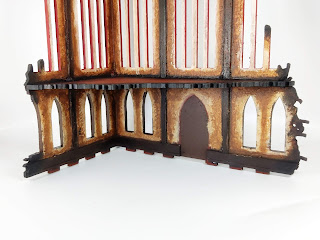
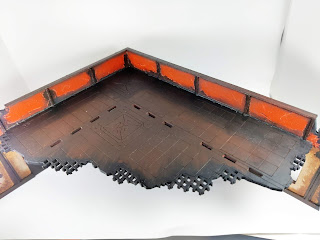
I did discover this floor has bowed, which was quite a surprise. I think I stored it with something on top and it;s pushed it down by at least 5mm in the middle. I might look to try and weight it in the other direction.


I liked the floor like this, and probably should have left it. but there was going to be now way I couldn't add some more metallics and verdigris, so look forward to how I foolishly handle that in the next update.


Blessed Verdigris next...

Tuesday 7 December 2021

Manufactorum Container No.2

Afternoon #warmongers and #warhammercommunity I've been #paintingwarhammer Manufactorum Containers. Having varnished the yellow and black container I thought I'd continue with an easy red one.


It's effectively just the same as my Imperial Knights, but also a preparation for more of my building colour scheme.


It's just some Vermillion art acrylic drybushed highlights. Trying to keep out of the corroded areas.


It was very easy but it does make me question adding orange rust in the corroded areas as currently the contrast is working really well and I don't want to muddy things up, so to speak.


I went through some debate with myself on whether the centre stripe would be Stonewall Grey or Bonewhite. 


But you can see I decided to paint the inside Bonewhite. I masked off the outer and used my Army Painter Skeleton Bone spray on the inside. Naturally I wasn't too fussed about getting all the way to the back as it would be darker.


I then thinned down some of my Burnt Umber art acrylic with Lahmian Medium and it mad a great wash. I think it's sufficient not to even require any further highlights inside.


But that decision meant the centre stripe would be bone, to match the inner. 


Burnt Umber splodges and mottling were used to add texture and weathering, I love this paint.


Again, it works really well with the darker rust, so I worry a bit about potentially adding any orange that might dilute the effect so far.


And I added a BIG flippin' number.


Proof , once again, that BIG flippin' numbers make everything cooler.


I had a spare stencil from my own Future Containers which worked OK stippled on and then I neatened it up with the brush, again avoiding some of the rust.


The bone worked so well with the rust I have begun to question whether my white and orange container should be bone and orange.


So at this stage I decided to pause a little bit.


This was to give me time to think things through on how to progress my two remaining containers. In the mean time I looked a bit at some of my other buildings. I'd done a bit on my Sector Imperialis terrain as it was effectively the same colours as here but decided to move my TT combat terrain forward so I can address some of it's remaining colour choices..

Thursday 2 December 2021

Manufactorum Container No.1 Almost TO DONE!

Afternoon #warmongers and #warhammercommunity I've been #paintingwarhammer Manufactorum Containers. Naturally the thing I thought I just fly through has taken a little longer, even with some of the shortcuts I've taken.


But, I've really enjoyed doing it. I applied the Vallejo Rust Model Wash, mixed with Secret Weapon Rust Orange weathering pigments. It got a bit unrealistic in places so I tried toning it down with sepia wash, which worked.


I did forget that ultimately the matt varnish will tone this down even further but this stage is pre-varnish but effectively completed as I wanted to capture it at this 'save point'.


You can see where I've added numbers and how challenging it is to fit round some of the rust and weathering.


Oopsy. Here's where I stuffed up the number 7 stencil and had it too far away from the 2. It is quite annoying but I don't want to go back into it so it'll just have to be imperfect.


Some decals on the centre panel too. I chose to replicate those used on my Hapag Lloyd containers. These were from the old vehicle decal sheet. A quick sepia wash over the top helped them blend in.


However, the skull in the black diamond - it didn't register with me you wouldn't see the black diamond, or that there are skulls embossed in the centre of each panel making the warning symbol somewhat redundant.


It doesn't really matter though, it just adds a little bit more detail and texture to it. The control panel and servo skull got finished off too and all the buttons will get Tamiya Clear once it's varnished. The lights above and below the door will also get a coat.


At some point I'll have to do the Storm Bolters that go on the top but I'm really pleased with weathering. It is far from the recommended process - salt of hairspray technique but I think it works really well and was a lot of fun to play around with.


The more I try the more I'll experiment and maybe one day get even more realistic. This is effectively complete but I add a Great Big BLESSED VERDIGRIS Stamp of Approval when all three are done and varnished. For now I may just take advantage of my Great Big BLESSED VERDIGRIS Minor Stamp of Approval! I don't usually get to use it so any excuse.


Monday 29 November 2021

Manufactorum Container No.1

Afternoon #warmongers and #warhammercommunity I've been #paintingwarhammer Manufactorum Containers. First up was this yellow one, hoping to capitalise on my yellow and black chevrons on my Armiger Helverin I thought this might be straightforward.


A number of successive stippled coats of my Gamboge art acrylic, trying to leave some of the rusted areas still in place.


I used the Instar IV-16 yellow as a highlight on the Helverins, but I'm going to ignore that for speed and to see the effect on this.


The plan is to just highlight with VGC sun yellow. Removing a step from the process may make my plan to paint my Mechanicum terrain in yellow that much easier.


The plan is to paint the central bit black, but I'm definitely liking the red stripe too. It might be nice to do one in those colours in the future - of course that means more containers to buy when I have no real purpose for them!


And with the black stripe done. 


I added a bit more Gamboge in places and also some light highlights of Sun Yellow.


Naturally I want to add a big number somewhere and I'm not sure about some decals too.


But, the excessive rusting is making it a little difficult of where I can position these embellishments.


Hopefully, I'll find a way to add them that works for me.


Of course that decision making so is likely to slow things down as I mentally process what I want to achieve and how I go about doing it.


I will be adding some weathering next - rust effects etc.


I also need to pick out the details on the control console and it's servo skull.


Pleased with how it's going anyway.


So much so that I've actually started on the red and white one too, but will share those pics in a future post.