Tuesday 8 December 2015

Imperial Knight - Cerastus in manufactorum pt 16

Whilst bemoaning my lack of a decent macro function on phone I realised I should do something about it and found a macro/micro camera app that's achieved these detailed shots. I'm really impressed as the lighting is OK too, no filters to force legibility. I've battle damaged the carapace, so all the weathering is now done and it'll be lighting effects next. I did far more damage than I'd intended, just got carried away. I expected there to be less on top as this is a big guy and folk won't be able to get up top; so who is scratching and damaging the carapace? Well clearly someone much bigger so I'll have to work that out at some point


I added some more verdigris on the feet, which I think works really well now. I will have to debate whether to apply Secret Weapon miniatures weathering powders. I always imagined this thing kicking up a lot of dust but having covered a lot of the textured metallics with interesting patina am I really about to then cover the patina AND metallics with red and orange dust?


The OSL has started to go on and although I'm quite chuffed with the radial pieces I'm less convinced of the central white area. I'm trying inverse highlights [sort of ] as per Dan Grundy's suggestion and it's definitely working in some places.


But it's hit and miss in others, like the rear view illustrates here, the butt generator looks cool but the back power plants a bit suspect. I'll try and put some more orange into it to rescue it and the eye lenses also need doing.


Having used Mecharius Solar orange for the initial glow I was really impressed how it washed over the model but wished I'd added white to the glow area first as the paint left exposed bronze areas underneath which were dark instead of light. So I then applied white hoping the next highlight wash of pumpkin would fix it, sadly I was wrong as you can see on the two examples on the left and middle, whereas the right vent is a little more what I was after. Still, I'm undaunted and think I can fix it.


The lance tip is seriously stuffed though, fixable but I've pretty much covered all my patina texture and it looks less like a glowing super-heated electric shock lance as some rusty spoon covered in Korma sauce!


Have no fear, I'll fix it though and to be positive despite this set back is an achievement in itself. It's really close to completion now and as I'd flitted between a lot of projects initially and then focused primarily on this I'll have to start looking at some of those other projects to take forward as a group again and then find my focus or choose a project and deliver it or just start something new for the giggles. Another decision but it's one I'll easily resolve once the knight is done.

Parts: 1 | 2 | 3 | 4 | 5 | 6 | 7 | 8 | 9 | 10 | 11 | 12 | 13 | 14 | 15 | 16 | 17 | 18

Sunday 6 December 2015

Imperial Knight - Cerastus in manufactorum pt 15

Right, let's 'foot this ship up', or rude words to that effect! Having carefully applied my decals it was time to make them all scuffed and damaged. I did apply Army painter Anti-shine to cover the gloss varnish and on some panels Lahmian Medium [as suggested by the guys in the GW tutorials]. I have to say the Lahmian Medium is more effective at matting the gloss finish, it's coverage is also better but there are still areas where the gloss shows through. It's no doubt difficult for the medium to find purchase on the smooth surface but I'm sure it'll be fixed with a subsequent coat or Anti-shine. As for the decal, I have figured out why I'm not 100% convinced - the wonderful tecture created by the Vermilion craft acrylic doesn't show through the decal on the Cog. If this had been hand painted you'd have seen that. I've shaded it a little bit but it's still overly bright white, the scratches came out really well, especially the way the paint looks to have smudged. The litany across the top of the guard is a bit dubious but I do think it looks a little like chains so that scotches any concerns.


The other side got a bit fiesty. I think I was overzealous on the highlights on the damage, they're a bit too chunky when viewed close-up. Afterwards I felt I'd rushed it and been clumsy but as the previous comments have made me realise I'm being critical because I am looking at it close up. But it has made it more interesting and the damage on the shins would be considerably more given the way it smashes through terrain and stomps on everything,


And the damage on the chevrons, ooh! If I can mange to replicate this range of highlights on my Ravenwing I'll be a happy man. I'd toyed with the idea of using the red edges as highlight but went for tints of the top layer of paint. I think that makes some logical sense but I'm sure there could be red in there too as it gouges through the Red Oxide Primer the knight is coated in.


Chest plates also got damaged up. I'm still wishing there were more markings and bits on it but I don't know what so this is it and I'm really happy with the result.


And I moved on to my patina, the lower legs of the Lancer. Now some of this weathering is completely wrong, I'm pretty sure it's not going to form inside those ball joints but it's a minor anachronism and only the most anal individual would notice it [just me then ;) ] Some areas had extra weathering on, that usually works best where there is more shading on the metal, the turquoise really shows up against the darker areas but I was bold on the toes.


The is was still wet and I've added more Turquoise in those hollowed areas. I see this as a central core with another metal forged around it so some areas weather quicker than the rest.


And more weathering, the entire lower section is done now and I was particularly judicious on the pelvic region. I went from a thinned turquoise to drybrushing and I really like it.


Until it gets covered up by the groin guard! That still needs the edges weathering though, but it is glued on! That's right I'm starting to actually add pieces together.


But you can still make out some of the great patina I'd created. The hip joints are less weathered just because I thought I'd done a pretty good job on the metallics and wanted to retain as much of that texture as possible.


So, it's all coming together now, a little more battle damage on the carapace and fist. then it's lighting FX on the lance, eyes and plasma areas. Then varnishing and some extra details on the base and umm and ahh about the missing banners...

Parts: 1 | 2 | 3 | 4 | 5 | 6 | 7 | 8 | 9 | 10 | 11 | 12 | 13 | 14 | 15 | 16 | 17 | 18

Friday 4 December 2015

Imperial Knight - Cerastus in manufactorum pt 14

Another decision made, although I wanted a predominantly red Knight every time I placed the front shin guard in place the whole red panel looked too much. I didn't really want to chevron it like the right guard as that wouldn't work with the planned AdMech cog decal I wanted. So I just went black, like House Raven. I know I've introduced white in places but adding highlights as I did to the chevrons has really tied this together. I love the slightly textured nature, it's almost looks like it's been coated in leather. I wonder if I can achieve this on my Ravenwing. Regardless I'll definitely try and find a way to use these craft acrylics to texture up my next Knight.


I then gloss varnished the shin guard and applied the House Raven symbol and an AdMech cog. I'm not 100% convinced now, the decals look too perfect. It was definitely worth doing and the models is far from ruined but I'll be finding ingenious ways to try and make them look less pristine.


I may be just a little hasty in my assessment though, it could just be the gloss finish. With some shading and maybe overpainting the cog so it isn't pure white, battle damage and a matt varnish it'll blend it in. The sad thing is I probably could have painted that cog freehand, and I'd have retained the lovely texture underneath too.


I've just spotted this isn't quite perfectly aligned as I'd thought, just a degree or so clockwise but the decals are fiddly. Still I'll weather this in too.


I also wanted to add some numbers on to the chest plate. Big numbers always look great on things. Not sure it's as effective as I'd hoped as the decal numbers are a bit measly but it adds some more interest and if I weather it up it won't stand out as much


Having spent a significant amount of time applying all the extra decals and being satisfied with the results but not exactly overwhelmed I decided to delay no longer my bronze weathering. All I wanted to do was the Power Lance, but I managed to do the carapace too. The actual realism in the verdigris is suspect. I'm still not sure exactly how it forms, I always imaging it'll be worse in areas where rain pools. Or, where the surface tension of rain would mean it was wet longest. So, for instance, you can see the top of the Lance has less patina than the lower edges. It's probably far from accurate but I definitely think it works and amongst the mild disappointment with the decals the verdigris has lifted my spirits.


I wanted less weathering on the carapace, principally because I thought I'd done a pretty bang up job on the metallics so I didn't want to cover it all up. So I was more sparing in the application with concentrations only around the rivets, creases and the bottom edges where it might pool slightly.


It reminds me of the sensitive weathering Marc van Holst did on his Iron Snakes. I'm pretty sure my process is a poor imitation, I'm just thinning down turquoise but I'm really happy with the results.


The only other thing of note was I tried using some of my new Anita's turquoise. Believe it or not I'm still using the same pot of paint I bought 5 years ago that has covered every nid I've ever painted, including the fortifications. It hasn't quite run out so I only occassionally dip into the new supply Evan S got for me. I'd already noticed the formulaiton is slightly different, it's not as opaque, even though it sounds thicker when I shake it, it's just a shade lighter and when watered doesn't quite behave in the same way for verdigris. It's a small annoyance I'll have to come to terms with eventually but for now it was back to my trusty pot [while it still lasts].

Parts: 1 | 2 | 3 | 4 | 5 | 6 | 7 | 8 | 9 | 10 | 11 | 12 | 13 | 14 | 15 | 16 | 17 | 18

Wednesday 2 December 2015

'nids part 181 - 30 Stealers


Although this looks like very little progress I have actually finished the red Planet Basing on all these sans bonewhite chips. This was after the first pass of Vermilion


And subsequent second and third highlight stages, in fact there may even be some pure pumpkin in here.


I'm definitely pleased I mixed up the two highlight batches a while ago and used some old Citadel paint pots to store them in. It's not only helped with this but my Knight too. It's also handy that the paints I used for basing - the Vermilion craft acrylic and the Pumpkin Docrafts are both cheap and plentiful. Although these paints are probably not best for using on your models, for basing it's ideal.


I see a lot of folk asking on groups and message boards about paint and I'm definitely of the opinion to use what works and what you're comfortable with. You only have to look at my Valejo Dark Angels green to see that although it's of no use as an opaque paint it can alter a base coat quite dramatically. And although I'll never use Seraphim Sepia to wash my models if I ever want some crusty powdery weathered effect to screw up my miniature then I know where to go!

Anyway, the next step for these involves the return of why I actually hate painting Tyranids!

Monday 30 November 2015

Gifts for Geeks - Tabletop Tyrant Squire plastic figure case winning!

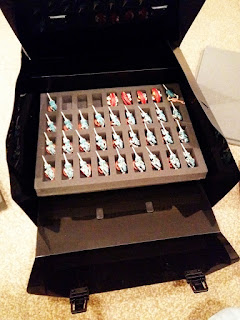
About a month ago Gifts for Geeks ran a competition on their Facebook page to win one of their Tyrant Army cases. It was essentially 'give us a reason why you should get one'. Obviously I've begun to rationalise how I transport my figures but I'm still moving a lot round in takeaway tubs and cardboard boxes. That's convenient for certain awkward shaped models but there are still plenty of rank and file troops that could do with a better home. So I entered and won a runner up prize of one of their Squire cases. These things [including foam] retail at £19.99 so it was a really pleasant surprise when it arrived.


And it came with a free custom Tabletop Tyrant dice too.


The case is made from plastic, it's the flexible sort often used in some ring binders. This is clearly not a case designed to protect against the rigours of war in the 41st millenium but it will hold your foam and figures safely for storage or if you only need to nip to a local gaming club or your mates. Saying that, the extra foam covers make the interior quite a solid mass so there is little flexibility when it's shut, although I wouldn't stand on it.


The front panel has two flaps that hook into holes, when you disengage them the whole front folds up and you can access the trays. I received the standard infantry trays, I really wanted to ask for a 60mm deep pick and pluck one for my warriors and other assorted larger models but thought it cheeky given this was a prize and all. I can always order one anyway :)


As you would expect the trays are suitable for your average troop model, no real surprises and four stack on top of each other.


These are nearly exactly the same as the old Citadel ones so are easily transferable between cases should you feel the need, it's handy for me as I can use this for storage and the Citadel case for transport.


I noticed only one criticism of the foam, the adhesive between the base and tray isn't as strong as I'd like. It doesn't take a lot of effort to separate the two pieces but no doubt if it's left alone they will remain intact for as long as I need them. I'm pretty sure they're actually the cheapest tray out there at £4.50 so they're worth a punt on their own.


And it takes up less space than the Citadel case too. Bottom line, if you need to protect your figures and are cash-strapped then this is an ideal solution. Alternatively there's the KR Multicase that they do for a little more at £22. PeteB swears by these and you can get another 16 models in a case so that balances out the extra cost.


I'm definitely chuffed with it, now I just need to paint more miniatures to go inside!

Saturday 28 November 2015

Imperial Knight - Cerastus in manufactorum pt 13

So, do you know how to play Russian Roulette? Well lets find out if decals are next level or a big old scam. First up I'm trying the old gloss varnish prior to decal to avoid that shine that appears. Have to say the panels come up really nice with that glossy lustre. The colours are much richer too.


House Raven symbol, looks pretty cool.


House Raven coat of arms. I really like this badge, loads of detail I wouldn't have been able to paint. It seems a little desaturated but I still think it was worth adding on. I'm thinking of adding some purity seals on top so it looks like it's received a lot of commendations.


The Metalica manufature stamp. I will be trying to tone down the white with a little sepia wash. You can just make out the bottom edge of the transparency though. I used MIG decal softener to help smooth the decal on. PeteB had been raving about MicroSol so I thought it wise to use some but hadn't found a source I was happy with. I remembered there is a ModelZone in WHSmiths in the Arndale in Manchester but its a hefty walk and as I have to walk past the front of Piccadilly train station I suddenly stopped and decided to pop into a Railway Book and Model Shop, what I found was a treasure trove of obscure items I could use for my hobby which included:
So everything I needed within a one minute walk of my office, which beats my usual five minute walk to pick up Army Painter washes. They even have Bolt Action model soldiers and rules, which may come in handy for Ben and Otty who are exploring WWII games at the moment.


Anyway, I decides to do a little video of me applying the decals. So far I've only done one 40kaddict video and in all honesty I think it's a bit rubbish because it's SOOO boring and I'm pretty sure if my voice doesn't send folk to sleep it may actually cause them to consider self harm of some kind. I think I recall a Doctor Faust painting video where he put on a mad professor voice that really worked and my boss does a lot of voiceover things for work and he gave me tips for better narration. In the end I thought screw it, took my 9 minute video, speeded it up by a factor of four and found some upbeat music I have no right to re-use so if you feel like watching two and a bit minutes of me applying decals have at ye!


Parts: 1 | 2 | 3 | 4 | 5 | 6 | 7 | 8 | 9 | 10 | 11 | 12 | 13 | 14 | 15 | 16 | 17 | 18 |

Thursday 26 November 2015

Imperial Knight - Cerastus in manufactorum pt 12

Next level? I think so. I couldn't help myself and did another load of damage on the right shin pad and I think I did a much better job than my first attempt.


It's definitely helped mitigate my less than stellar litany efforts. I did however become unstuck because there are supposed to be house Raven decals on that red side and obviously I've now covered it with damage I don't want to cover up and then have to re-apply/blend in. So I think I'll abandon following the heraldry too closely. I suppose I already did that with the white stripes.


I also applied a bit of very bright yellow [not sure which VGC one it is]. Although I was loving the realism of the Tau Sept Ochre my love of high contrast means this captivates me much more now. Although I think I managed to be much subtler with the application than normal.


And so I had to add it to the carapace stripes too. I also added some litany script, which quite frankly I'm just relieved will be mostly hidden by his shoulder pad


I was a little rougher with the application because there's no texture on this edge, trying to paint in some where it doesn't exist. It's passable, and again although the griminess has gone, I still really like it.


As you can see the shoulder pad does cover some of the litany. It looks a little misplaced on it's own, I feel the two panels either side would benefit from some script but being less than impressed with it so far I don't feel too compelled to add anymore disappointment in that aspect.


Here's the other side, where a Titan marking is equally MEH! For one aspect I was always so happy with on the Dark Angels and my Reaver Titan it's just failing here and I'm not sure why.


The shin pad in-situ


I think it's time to try some decals next. Haven't used them in years and part of me doesnt want to - given the freehand nature elsewhere, but they're so nice I feel it would be rude not to.

Parts: 1 | 2 | 3 | 4 | 5 | 6 | 7 | 8 | 9 | 10 | 11 | 12 | 13 | 14 | 15 | 16 | 17 | 18