Saturday 20 July 2013

'nids part 93 - Tyranid Bastion growth pt14.

How about a '3fer' on the old Bastion? With the cat out of the bag on it I should be racing through these now and in the spirit of micro-blogging this is just the undercoat - Red Oxide Primer, it's a much better coverage than my white so I'm with it. Also sand has been applied to the base edges.


And on to part two. I decided that given the dry-brushing of the base was likely to be messier than the actual painting to do the base in on go before the rest of it. It's quite a bizarre sensation to see part of it 100% completely painted while the remainder has still so much to do. 


Most of it adheres to my Red Planet Basing formula, just scaled up and using some of my slightly cheaper paints. Additionally you'll notice then Chitin plates received a wash, not sure why, maybe I was of the opinion that the blue wouldn't cover everything so it was just belt and braces against seeing red in all the nooks and crannies instead of black/shadows.


And the 3rd part, just a base coat of BoneWhite.


And in slightly better lighting, but this is the culmination of 3 nights work.


So much for the micro-blogging!

Tyranid Bastion Foamboard core template part 1. | part 2. | part 3. | part 4. | part 5. | part 6. | part 7. | part 8. part 9. | part 10. | part 11. | part 12. | part 13. | 

Friday 19 July 2013

Armies on Parade board, your help needed

This is a live request, I've interupted my usual schedule for a bit of advice. The original intention of my Armies on Parade board was to do a plain 2'x2'. Giving me the experiene of laying down some foam and then covering it in what I thought would be a good coating - PVA, flock and my vermillion art acylic. I was then going to use Red Oxide Primer to add some additional tones and then go about adding even more effects.

However, I cut my 2'x2' from a sheet of 5mm MDF [8 mins spent on this already Warhammer 39,999]


And I also have these sheets of 1" thick peach foam. Unfortunately the foam was originally 2" thick and my brother kindly split it but the resulting rough side, which would be the top surface, would require a bit of finishing to be in a state I would be happy with. Additionally there isn't a piece that would cover the board in one go so I'd need to add sections here and there. Quite frankly my current passion has shifted elsewhere and I just want to get this done and finished so I can move onto the other things and then crack on with the Dark Angels, I owe them.


So my new idea is to just go with the flat MDF and perhaps use that hill shape for a hill in the corner, I think I'd be comfortable just smoothing off the hill. Although I'm conditioned to think this board will be too thin, you expect at least an inch on these things but at least it will be lightweight and easy to transport - the figures are the key element for me, not really the board.

My issue is this doesn't fit with the original intent, it doesn't give me the skills should I wish to create my own Battle Board, although I've been considering just throwing the towel in on that and going for a GW Realm of Battle board as it could fit with Liam, Ben and Otty's. However I don't play at home, the eldest is no longer interested and can I justify £150+ on something that will get little use? Whereas if I made my own for around £30 plus time I can easily come to terms with that.

So what do you suggest I do?
  1. Cut my losses and get it done so I can move onto the cool stuff.
  2. Stick to my principals and put the appropriate amount of effort I planned to learn the skills just in case I make my own board.

Thursday 18 July 2013

MOAR from my mate Liam - kit-bashed Daemon Prince

A harmless interlude from my Bastion progress, we'll leave the paint to dry before for alittle bit. So, lets remind ourselves of the insane creative genius of my mate Liam. This is his Daemon Prince which just won the Battle of the Brush competition at his local GW store in Bolton.


And here it is in it's pre-painted nakedness so you can get a taste of the conversion work that went into it's construction.


Some more angles, with a cork and cast resin base. If I recall correctly the head and perhaps the chain-axe ares removable and uses technical LEGO pieces for swapability.


You may also notice the black ring in the base, I think this is double based with a 40mm base fitting inside a 60mm [once again using LEGO] so it can be game legal and also super impressive for display [painting competition winning] purposes.


Tuesday 16 July 2013

What's on my palette?

A little over 6 weeks ago I did a little overview of what I was doing and how that was fitting in with my 'To Do List' and whatnot, the top four items weren't even on that list:

  • Dark Angels AoBR Tactical Squad
  • Dark Angels DV Librarian
  • Inquisitorial vault
  • Tyranid Bastion
As you know by now the Bastion has been finished and having just played in a tournament what usually happens is I hibernate for a bit, sated in hobby glory. But I really need to continue with my momentum and so in the next few days I'll take stock of the stuff I need for my next projects and sadly that means everything else in those list will have to go back into storage!!! WHAT?! Yes the poor old Dark Angels are still Unforgiven! 

I'm really quite saddened by that but needs must, hard decisions had to be made because despite my urge to finish off my Tyranid itch it's still there. This is in no small part from the massive support and enthusiasm from readers and commenters on the blog and forums I've been showcasing the step-by-step progress. But why am I dumping these just as they're getting good? Well...


Had you forgotten my Armies on Parade challenge to myself? Well that's about 6 weeks away to do the board and I think I've got enough 1" think foam to do the 2'x2' section, with a hill so that will begin in a week or so, just need a piece of hardboard or MDF for the base first.


Then, if I've time I'll try and make some Capillary Towers. I suggested it was possible with the Bastion templates and I'll give them a go and maybe prepare some shorter ones too so we have a bit of variety. I'll also use some coloured pop bottles so you can get a better idea of how the plates work.

And then I have another thing I may as well get on with while I'm in the mood...


That's right my two Plasma Hatchers Mycetic Spores AND they ARE on my 'To Do List'. These will be getting Chitin Plates on the base, like my own pod, some tentacles Milliput tentacles sculpted on [unlike my own pod] and crater similar to what I already have. These will be my secondary choice of pods for when I have to field two or more, say a Doom and a squad of Devgaunts in your back field - NICE! I want to try a little more Reserve shenanigans.

I've a couple of other long term ideas mulling around but not before September and as you can see 6 weeks is a big difference. I'm also going to try and get a handle on this micro-blogging lark, obviously not this and not my upcoming Battle Brother reports, but given the Bastion is complete and grainy shots of it have appeared in the wilds of Nottingham there are really no more surprises. When you add in the fact my painting progress usually runs the same route there aren't too many revelation in that too. 

So I hope you don't mind a set of brief descriptions to some picture heavy posts while I get on with the next project and if Warhammer39,999 is good I'll try and time it all too. And there you go, you know as much as me... yeah right, you have absolutely no idea what madness I've got brewing and I need to get this junk out of the way so I can get onto the good stuff!


Sunday 14 July 2013

Battle Brothers

Just back for my 'blind gaming' tournament and I was not kidnapped and sold into the white 'Dwarf' slave trade. Dan - my mystery Battle Brother was a true gent and we had an awesome three games against five other complete strangers but equally decent and fun guys to game with.


In fairness, there was only one other entry in the best Fortification category - an Aegis Defence Line so I ended up with the Monument of Legend Award.


Both Dan and I'd army also got nominated for best Army too!


But biggest surprise was that we came 2nd out of 68 pairs! We won all three games and the last one in particular was an emphatic win over Space Wolves but there was a pretty decent tit-for-tat slaughter that went on when we did an alpha strike of around 300+ points damage and gave us 3VPs which couldn't dampen the spirits of our opponents and nor should it when their rune priest managed to kill 445pts of Mosntrous Creatures with Jaws of the World Wolf and gain them 1VP in the process, only for the Doom to then Muller an entire squad. Awesome, awesome game and they'll all be reported on as soon as I can.


Oh, and here's a spoiler alert - the Facebook Gallery is here: https://www.facebook.com/media/set/?set=a.630431333643017.1073741886.212614545424700&type=1 but if you don't want to see the completed Bastion then you may want to avoid it, your choice.


Necron tactica and showcase from my mate Ben pt2

Here's the second part of Ben's Necron tactica and army showcase [thanks again for putting this together Ben].

Troops
The necron warriors are a cheap troop choice durable and their gauss blasters can always glance vehicles.
I always take 2 big units of immortals with teslas. The tesla weapons are amazing the extra hits rule makes them great at snap firing and the high strength gives them a chance of wounding even the toughest opponents.


Triarch Stalker
Its targeting relay helps the troops hit making their weapons twin linked if they choose the same target and its heat ray gun is a great anti-armour weapon thanks to its 2 shots and melta rule.


Scarabs
I put these in to slow down the advance of an assault army and to rush forward giving my opponent an immediate threat. There entropic strike rules can also help pull the most heavily armoured vehicle apart.


Canoptek Wraiths
These are my assault troops great invulnerable save and good in close combat the whip coils can help them get an assault in before my opponent, without this they tend to go last.


Annihilation Barges
All my barges have Tesla cannons and Destructors. The twin linked Tesla Destructors are phenomenal. High strength multiple shots I have found they are even great at shooting down flyers thanks to the special tesla rule. As if this wasn’t enough they are hard to destroy good armour and jink saves.


Fortifications
Finally I took an aegis defence line with a quad gun. I made the defence line from one of my monoliths as I found they aren’t any way near as good as they used to be and to be honest it makes quite a good defence line.


The quad gun was made from left over monolith bits a tomb blade, and I used gauss blasters from the tomb blade kit making them longer with sniper rifles from the deathmarks. The defence line was something that perhaps I didn’t need in my list but my fear of flyers made me take one. In its defence (no pun intended) it did intercept and blow up an Imperial guard Vendetta.

Necron objectives
I have found this necron list very very good and believe you would have to be very unlucky to loose with it. I played 5 games at TOS and numerous games with Dave, Otty and Liam and have never lost. During TOS though I was matched against a fellow Necron player and, even though I won, I realised how frustrating and in many ways soul destroying it can be to face a Necron army. Consequently I haven’t played with my Necron army since.


I have been battling with one of my mate Liams armies, which he has kindly lent me, Imperial Guard. I have now gone from one extreme to the other, from always winning to always loosing. I have found Imperial guard very hard to win with but to be honest asides the games where I have been tabled (thanks Liam) I have enjoyed the games a lot more. Trying to win with a poor codex is much more fun than winning with the best one and I believe Necrons are the hardest race in 40k. To back this statement up Necrons where the best performing army at the Throne of skulls we attended having the highest average score.

Warhammer 40K Throne of Skulls March 2013

HQ
Imotekh The Stormlord
1 Royal Court
1 Cryptek Harbinger of Eternity aeonstave  Chronometron
1 Cryptek Harbinger of Despair Abyssal Staff  Veil of Darkness
1 Cryptek Harbinger of the storm Voltaic Staff

Troops
9 Necron Warriors
9 Immortals
10 Immortals

Elites
Triarch Stalker

Fast Attack
5 Canoptek Scarabs
3 Canoptek Wraiths  1 with Whip Coils

Heavy Support
3 Annihilation Barges Tesla cannons 

Fortifications
Aegis Defense Line + Quad Gun

Friday 12 July 2013

'nids part 92 - Tyranid Bastion growth pt13.

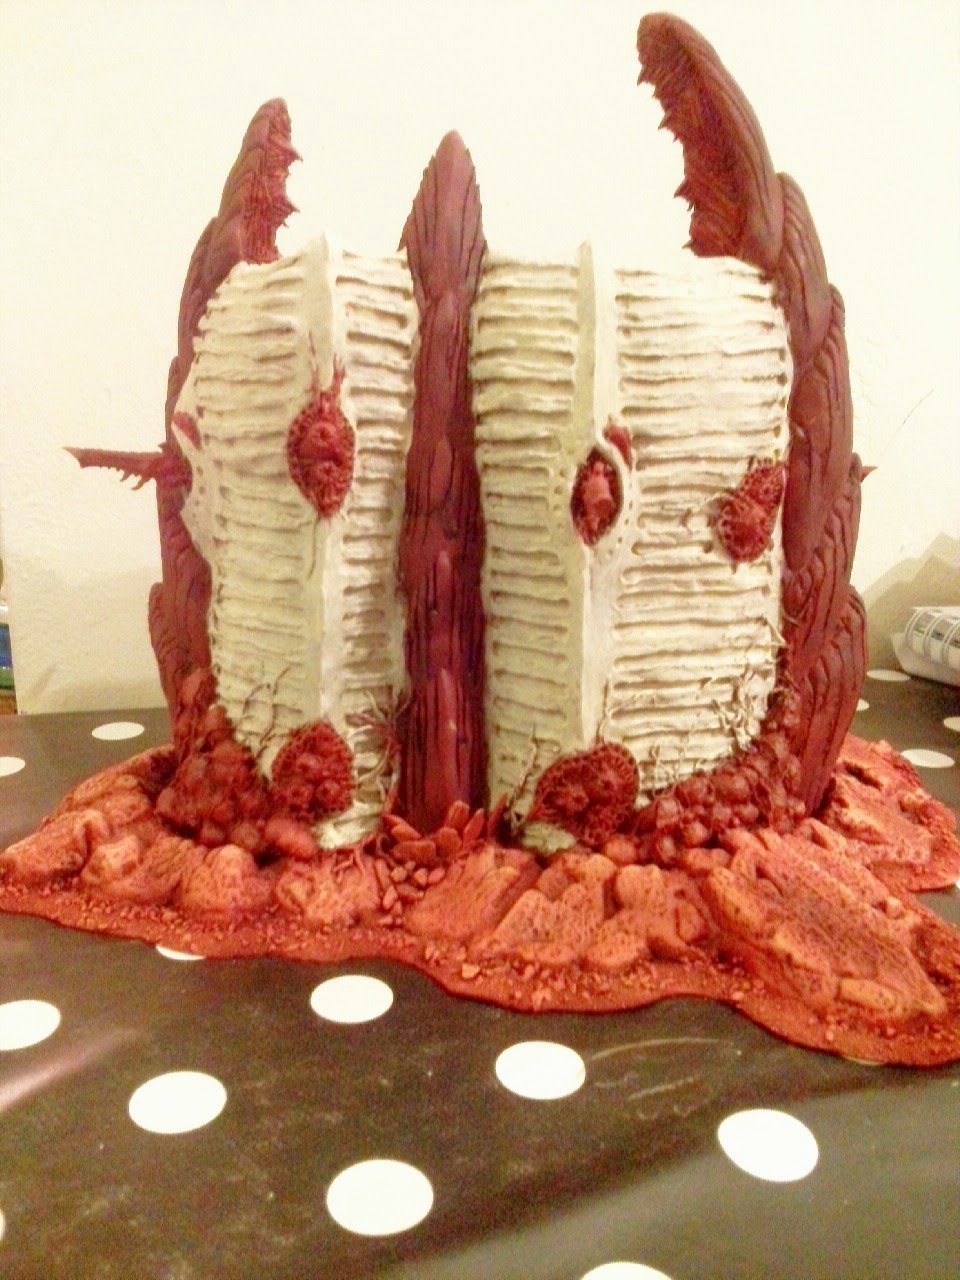
Another 2fer, with 2 days updates. Firstly I decided to sculpt some fleshy bits round the fire ports [node points]. 


I'm not 100% convinced this was the best thing I could have done but it did need something and eventually some more red flesh should go some way to break up the large bone white walls.


As you can see I also added lava rocks at the base. I'd originally planned to use beads and paper balls but once again chatting to my brother about his lizard vivarium he reminded me about them and they do make  less uniform blobs and therefore more interesting more organic shapes. I've also got tons of them so go with the easiest option.


With a bit of effort I'll get it to blend in a bit more than the 'stones stuck on the side of the building' it resembles at the moment.


An we're coming full circle to the skills I picked up on my first kitbash - Carnifex to Tervigon


The lava rocks were covered in small bits of tissue paper soaked in PVA. This gives a thin membrane stretching across the lava rocks much like the birthing sac of the Tervigon. I want it to look like the Bastion is gestating Tyranid bioforms. It's not just a defensive structure it's part of the Hive and as such fulfills a variety of rolls.


I also added a number of tendril vines coming out of the fire ports. As usual this is just PVA soaked unwound string [or twine]. I actually had two different gauges here so tried to mix and match to get a pit of variety.


With the inner towers, where there was less of a crater I wanted to show the tower had pushed up through the surface a bit. Once again I'm not 100% convinced I got this spot on, I struggled to find some reference imagery but some slate and Milliput did a half decent job and when the sand goes on it should cover up any inconsistencies.


More vines and PVA membranes


The single vines seem to work the best here I think. The vines that have not been unwound so much do tend to look just like frayed string but hopefully the paint job will suggest otherwise. I also added a number of crafting beads in the crevices between the larger lava rocks. These will be picked out in green the same way I did the small pustules on my Tervigon [picture at the end]. Once again this is to break up the expanse of colours and add a bit of variety.


The other ground-rupturing inner tower


If you go back to the start of this update [or any other updates for that matter] you may notice that the moonscape base is attached to mounting card. I'll be adding sand to the edges to transition the crater but before that I decided to cover the card with Milliput. This needs to be durable, especially on the edges and I didn't want to rely solely on the mounting card. Of course it's only reinforced on the top but I think it should make it considerably stranger than card alone. A simple thin sausage was pushed into place and carefully smoothed with not too much water as I didn't wish to soak the card.


So folks, aside from adding sand to the base that's the construction done as far as I'm concerned. I may add a few wandering Adrenal Glands but I'll do that after it's painted which will be my next update. 

As promised you can just make out the Tervigon's maroon incubation sacs with the livid green pustules I aim to replicate this on the lower sacs on the Bastion.


Tyranid Bastion Foamboard core template part 1. | part 2. | part 3. | part 4. | part 5. | part 6. | part 7. | part 8. part 9. | part 10. | part 11. | part 12. |