Friday 14 August 2015

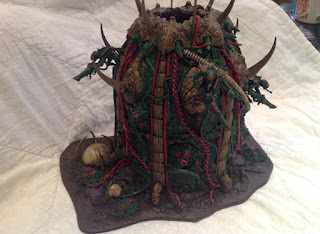
Otty's scratchbuilt Tyranid Bastion

You know me, I love Tyranid Fortifications and I obviously have strong views on them particularly those that claim they're not something Tyranids would do - they absorb and mutate other life forms, steal their tactics and evolve to overcome them if you don't think they'd produce fortifications alongside the rest of their bio-constructs then you're not looking at the same faction I am. And to top it all considering GW have no love for creating nid fortifcations then it falls to the hobbyist to make their own and they can be as easy or complex to build as you like, thanks to their organic shapes. Now my old mate Otty has empited his bitz box here on his Bastion, with enough spares that it propably costs more than a standard Imperial variety. Enjoy the pics and his decriptions
Here are some photos of my tyranid bastion. The first is black undercoat, then onto block colours.


the third and fourth washed

then the last 3 are the layers and highlights.


This is the finished article. The hole at the top, isn't quite as large as I would have liked, it did start off larger, taking the inspiration from tyranid box art ,which appear to show bastions or towers in the background. I extensively modified the original, adding more scything talons and numerous tyranid components. Changed the automated weapons for gene stealers holding death spitters.


I love the way those Devourers poke out perfectly from those gaps in the Carnifex carapces that are there to accomodate it's vent stacks - inspired.


Well what do you think? There's got to be a point soon where we look at another Apocalypse game I hoped I'd be able to field more of my army now but Otty keeps banging stuff out of such an awesome level I'll struggle to fit in my stuff ;) Anyway, he's given me some more pics to share with you  so look out for those and I hope this has inspred you to build your own nid structure.

Thursday 13 August 2015

40kaddict Towers - board, board, board

I'd been a bit apprehensive about the weekend. I'd been asked to referee a kendo tournament. As I haven't done kendo in 5 years, refereed about the same and I'm no longer even eligible to be a member of the British Kendo Association because I'm no longer a member of a club then I wasn't sure but my friend, and British Kendo Team member, Tom Widdows invited me to help out and I changed my mind. I'm glad I did as it was a really good day but it did mean I had a lot to do on the Sunday to make up for the lost day. First up I had to mow the grass and build a new computer table before I even got in the man cave but when I did I was on a mission. I measure up the window board and then insulated it.


The board went in bang tidy...


...erm and then it didn't because the small corner pieces were set back a bit and I couldn't get my head round this discrepancy 


Until I realised the offcuts I'd used were from the ceiling panels and these are all 9.5mm thick compared with the 12.5mm thick wall panels! What an idiot, oh well maybe the caulk can help disguise the step.


So I continue on with the back and put the first lot of insulation up after measuring the bottom board.


Second lot of earthwool goes in


And then the board secures it all in place.


And the upper board goes in too.


So the back wall aside from the two apex pieces is done.


I then quickly insulate the other side piece. I actually get one of the smaller pre-perforated sections to go in without need for staples. Wished I'd done that on the right side as that's all piecemeal sections whereas this is super stuffed. I actually cut and attached the board too, I just ran out of screws so didn't take a picture as only half the screws were in place. I bought two packs of 200 screw and expected to take one of them back and instead I need to buy another bag! So I'll have spent £9 on screws alone, it keeps adding up. Whilst I was at it I also measured and cut the left hand window section.


And whilst I was at it removed the right hand side panels and used them as templates to cut new 12.5mm thick sections and installed them. I may be short of screws but I can use time wisely to fix this mistake at least.


As you can see it's slightly tidier, less of a step down at least between the boards.


And to cap it all off I trimmed one of the pieces to go on the door but didn't take any pictures, it's super awesome though. So all that's left to do of the boarding is the two back wall apex pieces and the three front wall apex pieces, oh and to get some screws to do it. But overall this was a pretty epic stint, I've shredded my Tyvek suit with the amount of measuring but luckily my back held out. I expected this to take about a week of evenings to get done so I'm stoked at the progress.

Wednesday 12 August 2015

The 2015/16 Hobby Season starts soon, join me!

The 2015/16 hobby season will be starting soon so for those alumni who joined in last year it might be cool to look back at your lists at what you've achieved , what might have slipped and those lovely unexpected successes that happened despite life getiing in the way and loss of mojo - I speak from experience.


I think from my perspective things started out OK but progress becamse more difficult towards the middle part of the year I didn't even manage to achieve half of my planned goals but that's not a bad thing as I did quite a few other things that I'll cover in a review of my 2014/15 hobby season coming soon. Then, on the 28th August I'll be revising my new plan for the forthcoming season and see what lies ahead of me.
In the mean time I created a new set of Big Green Stamps of Approval, this time I did them as transparent gifs so hopefully they'll look better on whatever blog background you use, However I probably should have done them as .png because I'm not a huge fan of the bitmap edges. Anyway, there's four of them, my onw 'branded' version, a non-branded one and a major and minor project stamp if you're that way inclined to record your achevements. Personally I'm just happy to get something done. I hope you all take part again and hopefully we get a few new participants, they'll all be on my community tab when the dust settles

Tuesday 11 August 2015

40kaddict Towers - I'm getting board now!

With the upper board measured and ready to go it didn't take me too long to add this piece in.


Sadly I ended up with a bit of gap on the left had side. Luckily I ended up with a bit of a sliver which has covered most of this gap, at least until I put some caulk in it.


With a bit of momentum I actually tackle one of the tiny strips alongside the window. 


The original plan was to do the tiny bit on the left side of the window but for some reason I swapped things round, grabbed some off cuts and knocked this up quick smart.


I did however discover another crack on this side, not sure how this happened again I'm hoping some liberal addition of PVA might just seal it a bit and the painting will cover it all up. If this is the worst imperfection in the boards I can live with that.


I've got windows and the other half of the back to do next...

Monday 10 August 2015

Now this is a man cave!

I'm not the only one who's relocating their hobby enterprise, a number of people have shared pictures of their efforts or their planned purchase on the Facebook group. Of these I had to reshare on the blog Otty's Man Cave, although by the size of it it's more like a cave system! What's more impressive is Mr Otterburn has built this with his bare 'man hands' from scratch no doubt after going out hunting non-favorit,e non-named animals, probably a Mammoth, making fire from sticks and wrestling a blue whale! He's like Bear Grylls and Tommy Walsh rolled into one!


This is not some pre-built shed, oh no and I bet it's possibly no more expensive but if you've got the skills to construct such a beast, including the base and a back capable of smashing up a load of concrete to put down for it then this is definitely the way to go.


I don't even know where I'd start with this sort of build. I spend about 15 minutes Every night after putting up one plasterboard panel just trying to work out what needs doing next and whether I’ve everything I need to get it done!


Anyway, he's included a little bit of background info with the pics so I'll leave you to his knowledgable descriptions:

The whole shed is lined with dpm then clad internally with osb and as soon as my parents front room is decorated and furnished, I will inherit carpets for the ground floor.
I've left a hatch into the loft space which I will be installing a set of wooden stairs.
Ive used osb as flooring in the loft

Not only that but he's sent me a load of pictures of his recent additions to his Tyranids including his scratchbuilt Bastion so alongside future updates to his man cave build I'll be sharing those too.

Sunday 9 August 2015

40kaddict Towers - another board session

I had planned to do quite a lot last Thursday evening and you know what they say about best laid plans. Instead of cracking straight on with the shed I had to nip out to pick up a new laptop, which ordinarily would be a moment of celebration but too much is going on for me to enjoy this new bit of tech. It did allow me to pick up the correct sized wood for the door but the super cheap skirting board wasn't available to I could only kill two non-named, non-favorite, birds with one stone instead of three. So it was 7:30 by the time I got home which was a bit of a late start but I cracked on. Did all the measurments on the two boards that will cver 90% of the left hand side of the back wall. Then it was the unpleasant insulation.


I guestimated and cut the smaller left panel but my guessing was way off and I had to add lots of little strips and bits to fill out the cavity. It's not too bad actually but now I'm runnign out of staples as half of them don;t even go through the thickness of the earthwoll anyway, which is annoying. I opened up my third roll of Earthwool and split two-thirds off for the wider middle section. You can clearly see where the pre-cut perforations already exist so all I did was unwind the piece I need. It was also hand to wrap roudn tthe two little mid wall studds I added for extra support. I also realised that I'd forgotten to put any extra wood at the top but I was luckily able to peel back the insulation and add two pieces to allow screws to be placed on the top panel and the Apex board wedges.


I was really lucky with the bottom board as the insulation was not as flat as I would like and there was another real risk that the internal pressure would pop the screw holes again but it went on fine. I then trimmed the corner of the top piece so it could accommodate the bottom-left sloping edge.


Light was fading at this stage so I didn't persevere. The board is ready to go, the fit isn't perfect there's a bit of a gap in the bottom left corner but it has to be that way or the right edge won't line up with the extra studwork. Far better to fill a gap than not have the board attached. But I'll get that piece up tomorrow and then decide if I continue on the back wall, which will be difficult as I've run out of longer screws to add the mid board studs, or try some of the front wall pieces.

Saturday 8 August 2015

40kaddict Towers - second side done

I managed to reach some kind of resolution about the progress on the shed, I think the sooner I move out of the back room the better a situation that has been accelerated by a 'scratching' noise we've heard in the walls/roof. I'm of the opinion it might be a mouse but we need to discover how it might have got into the cavities and if it's finding a way to breach the walls. Obviously all my hobby stuff is preventing us see whether any ingress has occured...

So, moving on I managed to put up the left wall's insulation, and I did add in the little stud support in the centre panel. However I didn't trim down the 60cm wide earthwool so it was much more bulky than the other side.


Which I would live to regret as I struggled to fit the board on. I persevered though and a number of the dry wall screws just popped straight through the plasterboard as too much wool prevented them from securing flat to the wooden beams.


I just couldn't get the bottom left corner to slot into place so stupidly tried to shove it with a 2x1 only to rip through the bottome corner. So I unscrewed the board, reset it so both edges would slot into places and rescrewd it into place. I'm hoping I can try and make that bototm edge more solid iwth some PVA or I may have to reconsider adding a skirting board afterall.


The following night I was able to get the top section in place. I'd added a lot more staples to the earthwool so there was less pressure to combat. Measuring was pretty much perfect with the only cock up being I fogot I had to trim 6 or 7cm off the top edge and did all my measurements and marking only to have to cut them off and redo them! But the board went up perfect after this


I even added a few extra 2x1s to the back wall. I keep convincing myself this will be easy to do as I only need to trim one edge of the board. The back wall is 3m long and each board is 1.8m so I just need to trim 30cm [give or take depending on with peice of wood I attach it to] and the bottom two panels will go straight on, but then I forget I also need to put in the markings for the screws which will be about 15-20 minutes and then I'll need to measure, cut the insulation and then tack it in place that'll be another half hour no doubt, particularly as there is a diagonal strut through the two end pieces and also the middle space is pretty wide so I'll have to crack open a new roll of earthwool. So 'straightforward' it maybe but I'm not so sure it'll be quick.

Then I've got to add the two panels on top, which will require a little trimming to accommodate the sloping roof and then a couple of wedges on top to handle the Apex, which worries me a little as again I'm not sure about the width of wood I'm going to fix to...