Thursday 20 June 2013

Support your local blogger - Facing The Grey Tide

For those that blog we primarily made some form of commitment with ourselves. To record our efforts and share those with others. Initially that's a shot in the dark, starting something with no audience and hoping one day to have a follower, some traffic and even just one person saying - "hey I dig your stuff" which makes us all warm and gooey inside.

Over time we'll join other blogger groups and one day one of the bigger boys might share what you're doing on their blog and suddenly it looks like the Imperium turned up on your blog because your 'hits' just went through the roof. Sadly some of the big kids have taken a break which leaves us 'middle-schoolers' [thats a fair assessment of this blog I think] to try and help out the new kids.

If I'm honest that's not going to bring a massive crowd to your fledgling site and whoever does turn up will be expecting to be entertained, informed and rewarded for their visit but we do what we can.


First up is Evan S and Facing The Grey Tide at http://ftgtgaming.blogspot.com, here's what he had to say
My most recent articles feature the new Eldar Codex with a review of the book and a battle report. I'm also hoping to finish up some of the STC terrain I got from you and show that off, with all due credit when I do.
So if you like my blog and my STC's then at some point you'll get to see someone else make some.


Something I particularly like are the battle reports which include pictures and accompanying text as standard but additionally there are top down diagrammatic maps of the action like the old White Dwarf reports. When I started doing reports I was going to do something similar, just less detailed but gave it up in the end as being too laborious. As I've said an average report can take a couple of hours to put together, a lot of respect to Evan for the diagrams, I'd imagine that's at least another hour on top of what I'd normally do.

So, nip over to Evan's Facing The Grey Tide at http://ftgtgaming.blogspot.com

Tuesday 18 June 2013

'nids part 84 - Tyranid Bastion growth pt5.

So I've iced my cake! Well, covered it in tile adhesive/grout. It was a cheap pot from a £1 store, I used about 2/3rds of it and applied it with a plastic spoon. it's not quite as tapered as I'd envisaged but I'm not worrying too much about that. I am worrying that it is slightly bigger than I planned, I probably should have done just the single tower regardless of the rooftop area.


As it is this represents quite a large piece of Line of Sight blocking terrain. I can definetely hide more behind it than a standard Bastion. I may have to position it obliquely so the opponents view is still a wdithe equivalent to a standard Bastion. I made sure I isolated each chitin plate so I could still take benefit from the pop bottle shapes.


The opposite side.


Next up I need to sand the grout ridges down a bit so whatever sculpting I do isn't interfered with. However, there is an 'organic termite-mound' look to it already and should you be nervous about your ability you could stop here and try and paint the beggar.


However, there are no fire points or emplaced weapon slots. I'll be representing the fire points with the ever-useful Tyranid node points. I managed to win an ebay auction with 11 of these for £2.19! So there'll be a couple left over.


Tyranid Bastion Foamboard core template part 1. | part 2. | part 3. | part 4.

Sunday 16 June 2013

'nids part 83 - Tyranid Bastion growth pt4.

The original plan for the capillary towers involved an empty bottle of Dove Shampoo that was quite tall which would be coated with Milliput but for some reason I'd recycled most of them a few weeks ago. Ultimately I was left with one option - a standard 2litre pop bottle. I used the upper and part of the cylindrical bit for the battlements and split the base into it's five 'petals' and trimmed and overlapped them up the tower.


Even with some heavy duty scissors you can only go so far in the base plastic as it's the thickest part. By cutting each petal out as thick as possible you then have five shapes that you can trim down so each is smaller than the nxt and that way they can 'grow' as they get further up the tower. I used mostly dress maker pins to hold it in place with some small points of hot melt glue because...


It turns out the heat of the hot melt glue can be enough to melt the plastic! You can just make out on the picture below, to the left of the middle spire, that was pinned back into place, just above that cut line you can clearly see the foamboard for the roof. This is because the plastic is melted back to that just visible white reflection then the glob of yellow glue. It doesn't matter if you can't make it out, it's there and it's an issue, particularly when you cut the battlements to fit and then they 'shrink' back from the heat, be warned [also that glue is super hot to the touch, even after application but somehow cools instantly as it burns your skin!].


Another melting area, just to the leftt side of the cross-member on the right, you can see the yellow glue curves away from the foamboard as the plastic receded. Also a genestealer for scale.


This is 15 models on the battlements, can't imagine Termagants being as forgiving and there's still scultping material to add. So long as I can fit 10 or 4-5 warriors I should be alright. I'm hoping more to be inside the building and using the fire points, not exposed on the roof.


The second main capillary tower and the two lateral towers get their pop bottle Chitinous plates. I also cut out some of the foamboard for where the door is going to be on the left.


Perhaps if I'd had some coloured bottles these would be easier to make out but hopefully the addition of grouting will strengthen and reveal the structure in it's entirety. It's surprising how quickly it seems to be filling out, hence why I've begun to focus primarily on this project ahead of the others.


Next up, lets 'ice this cake!'
Tyranid Bastion Foamboard core template part 1. | part 2. | part 3.

Friday 14 June 2013

'nids part 82 - Tyranid Bastion growth pt3.

From the template post you should have seen how I've made a nice slot for my foamboard. I have to say my Dremmel has become an invaluable tool in this enterprise. I don't use it often but every time I have it has made the process easier, quicker and much more relaxing, despite spinning blades, sanders and drills at 100s or RPM


Skeletal structure in place, glued down with hot-melt glue, gotta be quick with it though. So two tools you should be looking to invest in [if you haven't already] when you have some spare cash a Dremmel [or generic equivalent] and a hot melt glue gun [which can be bought for about £5!]


Here's the reverse view, the 'South face' which will have the door on the left. You'll notice some missing pieces from the battlements. These were cut off to allow the roof to slide into the remaining uprights and the roof slots. Each piece was then glued back in place with a cocktail stick embedded inside for support.


Now I was mooching around in the garage and I had some chunks of white packing styrofoam from a desk I just put together. It was in convenient sized chunk so instead of opting for my denser [more sensible] peach foam I used the white, my scalpel and some sandpaper. There's not template for this you're just going to have to sculpt 8 columns that fit between each cross-member and follow the roof shape. Alternatively you could pack it with newspaper or tin foil I suppose.


And the North side, which will be mainly fire points and emplaced weapons.


Now here's where the story takes and interesting diversion you may recall I painted a 'hide' for my brother's pet lizard. The other day he rings me up and asks for 5 minutes of my time to "look at something and give him my opinion". I was due to game that night and his 5 minutes didn't take into account the 40ish minute round trip to his girlfriends house, the first time I had ever been and a place obviously local but actually quite unfamiliar to me geographically speaking. I was less than keen but decided to do the right thing and I have to admit it was the right decision. He's currently making a vivarium for his beasties and this is how they do it, look familiar?


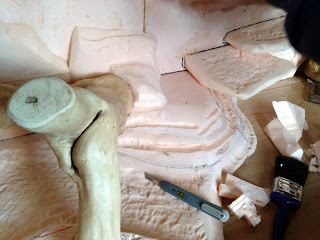
Now I have to say I was amazed, my brother is the car guy, playing around with engines and stuff. The last time I saw him be this creative was when he made a remote control hover craft from plywood. Bizarrely at the weekend I'd been to get some peach foam from B&Q warehouse but they no longer stock it and here's my bro with a stack of it and at least two sheets unused :)


He showed me a couple of lizard forums where they talk about their vivarium 'builds' just like I do here and on 40k forums. There's a whole world of folk doing terrain equivalents but for pets and techniques they use that will help me. With a base of foam he will now use several layers of acrylic tile adhesive/grout. I'm pretty sure it'll be like a surf board construction, foam core with a hard bonded shell.

I'm going to nip out to a £1 store and pick up any old grout, I think the acrylic stuff is safer for the animals. Regardless, with a grout base I'll then be able to add air drying clay or Milliput decoration otherwise if I tried to apply it directly to the foam it'd probably not stick and flex too much to get a decent finish. Before all of that I need to work on the battlements and create the capillary tower plates...
Tyranid Bastion Foamboard core template part 1. | part 2.

Wednesday 12 June 2013

You asked and the Great Devourer provides - Tyranid Bastion template

OK people, from a couple of comments it would seem there is some value in sharing the template I've used to make my Bastion, don't worry updates on that soon but before then I thought I'd share the template so folk can 'catch up' should they wish to do so. Here's  sneak peak at where I'm at, hopefully help with understanding the plans.


And you'll need the larger of the double moonscape craters and it'll need to be cut something like this, I drew  round the foamboard when it was constructed and used my Dremmel to cut the plastic.


So the template is at the link below, rest assured it's a bit whacky, well it does come from the mind of a Xenos. The difficult bits are the two cross members that are at an angle and NOT perpendicular to the centre line. Hopefully the top down views should give you a clue to how to cut the slots and the view of the crater has two yellow 8s the inner one is the roof and the outer one is roughly the footprint of the base and hopefully we'll taper all the way up to the inner 8.


Updates soon, but see if you can make hoof nor claw out of it ;)

Tuesday 11 June 2013

Charley Says - "please share me"

Some may recall back in February there was a random youtube link to a Harlem Shake featuring characters  from a British Public Information Film from the 1970s that was referenced in the Prodigy song 'Charly' in the 90s.

Since then Charley's been busy, he's got in on another meme - 'cat-bearding'


and has also made two new information films to remind people to fill up on fuel before going on a journey:
http://youtu.be/bn3Oz6KT2Jg


and also asking drivers not to drive too close:
http://youtu.be/fplPtxCqSww


I'd really appreciate it if you could share, tweet, like or repost the links, especially if you like or remember Charley. There's more to it than bandwagon jumping but it needs a kickstart, without kickstarter so help a little boy and his cat out ;)

PS, please no jokes about alternative meanings for his name, that would end whatever hopes for this to be a success.

Monday 10 June 2013

MOAR from my mate Otty - his Tyranid Mycetic Spore amongst others

I asked for some more pics of my mate OTTY's nids. As he's managed to game competively with a Mycetic Spore the size of a breadbin I wanted a bit more information to help with my Basiton construction and gaming concerns. Here are his comments:

In this position,the spore is 20cm in length, 12 cm in width and 12cm in height. Scratch built, the core made from a plastic beaker, some bone components from a lego pirate ship electrical flex, washing machine waste pipe, and spare bits of tyranid.


I was still curious about the construction so asked "Is the beaker the green ridged bits or has that had something else added to it. Would really like to understand how you did that bit as it's sort of the effect I want to do on my bastion, obviously in different colours."

the green ridge bits are milliput covered in tissue paper mache


Dakkafexes are completed.


As you can see OTTY has gone for the twin Devourers joined together and conveniently masked the join with some spare carapace spike parts, ingenuous.┼You really have to admire that chitinous pattern too. Not sure how long it takes but it look like and awful lot of work


Scratch built Doom


Interesting use of Barbed Strangler ammo sacs for the Doom's brain.