Part of me questions the need to celebrate these milestones, it feels egotistical in a way but if I'm writing a blog there's ego involved somewhere, it's all about me afterall darlings! Sure, but I always try to be as modest as I can be. As much as it’s worthy to note 800,000 page views, this isn’t me that’s doing it this is other people who’ve visited my 1000+ posts and found some value in what I’ve created/published. So although there’s a certain satisfaction that my efforts have not gone unnoticed perhaps it’s more a testament to you guys, you’re the ones making up that number afterall.
Therefore, thanks folks for dropping by and putting up with my ramblings. I’ve been particularly blog focussed recently, managing to source a lot of ‘real’ content and just random picture pieces. I try to fit the fluffy ones inbetween the main courses. I’ve also got some additional blogging tips I want to share if I can, but I know that’s going to require a bit of work so it may take a while. I also need to look at some of those long gestating fluff pieces and just get them down. Despite the effort and time to keep it up-to-date and vibrant I’m really enjoying the blog at the moment, your interactions, support and things like the AdSense Competition are making it all worthwhile. A big thanks to everyone!
As per my previous nid scratchbuilds it's time to 'ice the cake'! I got some tile adhesive and grout, the sort that's in a tube, this helped with application as you can just squeeze it on and smooth it with some water.
In some respects it reminded me of this 3D printed concrete castle.
I did find the application a little difficult in some places, I probably should have just lightly sanded the plastic to add a key for the grout to fix to, instead it kept sliding off.
But the tube application is really quite effective and if you want a quick VSG and your sculpting skills aren't great then I see no reason why you couldn't stop right here.
Obviously I have an aesthetic that I'm trying to match on my previous builds, so that's not an option for me. But, I think those shapes and effects are pretty effective so it's a quick win otherwise.
Sadly I'll be sanding a lot of this texture off so I can have a flat base for the air drying clay.
But the sanding will clean it all up and allow my to try and build the spire properly, it's a little thin, except for the base.
The inside was also 'iced' but I need to remove the top layer of card on the foamboard for when I sculpt that, which may interfere with the grouting, perhaps?
Lastly, just wanted to illustrate why leaving it at this stage is a possibility - a termite mound. As you can see this finish is perfectly natural. Just because a lot of the Tyranid aesthetic follows a similar style to Giger - with patterns, ribs, stomas, chitin plates etc. Things can be far more organic for nids and that means random form, without all those identifiable elements.
It's for that reason I love the possibilities in Tyranid terrain and structures. I may well have pigeon-holed my approach, made it convoluted and requiring a lot of effort and a modicum of skill. But that does not need to be the case, anyone can make these things, all it needs is the will, the time, the patience and a variety of easily sourced materials. The great thing is you can't screw it up - nature's not perfect. And it's really cheap to do, the original Void Shield Generator cost a pretty penny and having sold out cost a damn sight more. This has cost me £2.49 in grout, some foam card, a couple of lemonade bottles, a piece of MDF a few curtain hooks, paper towels, a plastic pencil tube and a noodle dinner costing 99p, the majority of which I had already anyway and were either rubbish or recycling! More importantly though, if GW aren't going to show some love for Xenos terrain, then its our duty to do so.
We've all seen this Ravenwing picture to me it's the most iconic representation of how I feel the Ravenwing should look - dark, brooding and menacing. I've said many times that I am not a fan of the white wings on Ravenwing, Ravens are black, they are not Magpiewing [much as I love Magpies for all their cheeky antics]. Now I will concede the Ravenwing symbol being white, but aside fro a small white symbol I don;t see these guys painting bits of their dark bikes white to startle their prey in the hunt. Sure Space Marines don't always acknowledge the tenets of camouflage but in this instance I guess they do, they have a floating caouflage mahine anyway so hiding from their quarry seems to be their thing.
So representing the wings like this seems pretty straightforward - it's just highlighted with a turquoise...
Which is what I've done. My Tyranid claw highlight was put on first [black and old Anita's Turquoise], then it was new Anita's Turquoise gently applied [I used the new one because it's coverage isn't as opaque so I knew I could manipulate it with multiple layers to belnd with great result for only the cost of repeated application]. I'll flat out say I love the results and the technique is so easy if I go down this road I may well blow the 'white wings are and obstacle to progress' issue out of the water.
BUT! There are a number of issues:
the artwork above are these colours because it's dark in the scene, is that what's conveyed by my efforts or does it just look like blue wings?
is this contextual? Can I make a decision without having applied the verdigris and additional black highlights to the bike?
could I even apply and additional grey highlight to the feather edge to imply it's lighter?
does the fact I haven't gone white remove it too much from the 'spirit' of the Ravenwing?
And a whole host of other niggling doubts, I'm chuffed with what I've done but uncertian with whether it;s appropriate for this application so your thoughts would be appreciated, it may be too soon and the best thing to do is finish the highlights on the black and do the Verdigris and complete this as a test [something I usually don't do]. I kind of thought last night sod it, just go with it being different, they're my toys afterall!
But these three are neatened up around the metallics waiting for highlights, wings and weathering
Additionally I highlighted the canopy of the Jetfighter, also the extra bit at the top. I actually sponged on the highlight thinking the added texture would help me as it has with the Knight but I think it just makes the finish look poorer for it. Still, it's built confidence for the black on the Ravenwing, something my Land Speeder failed to do!
I popped into the shed with my Void Shield Generator with every intention of 'icing' it with tile adhesive only to find all of it had dried out. With all my projects staring at me with dead soulless eyes I promptly ignored them all and went completely off list. I mean there are no Deathwing Knights on my To Do List whatsoever, I suppose I could justify them as part of 1,850 functioning army but I'm reaching. Bottom line all that expansion box needs to be done, the urge came upon me and I worked on it. So I was chuffed, even if this represents one night's work [90 minutes?]
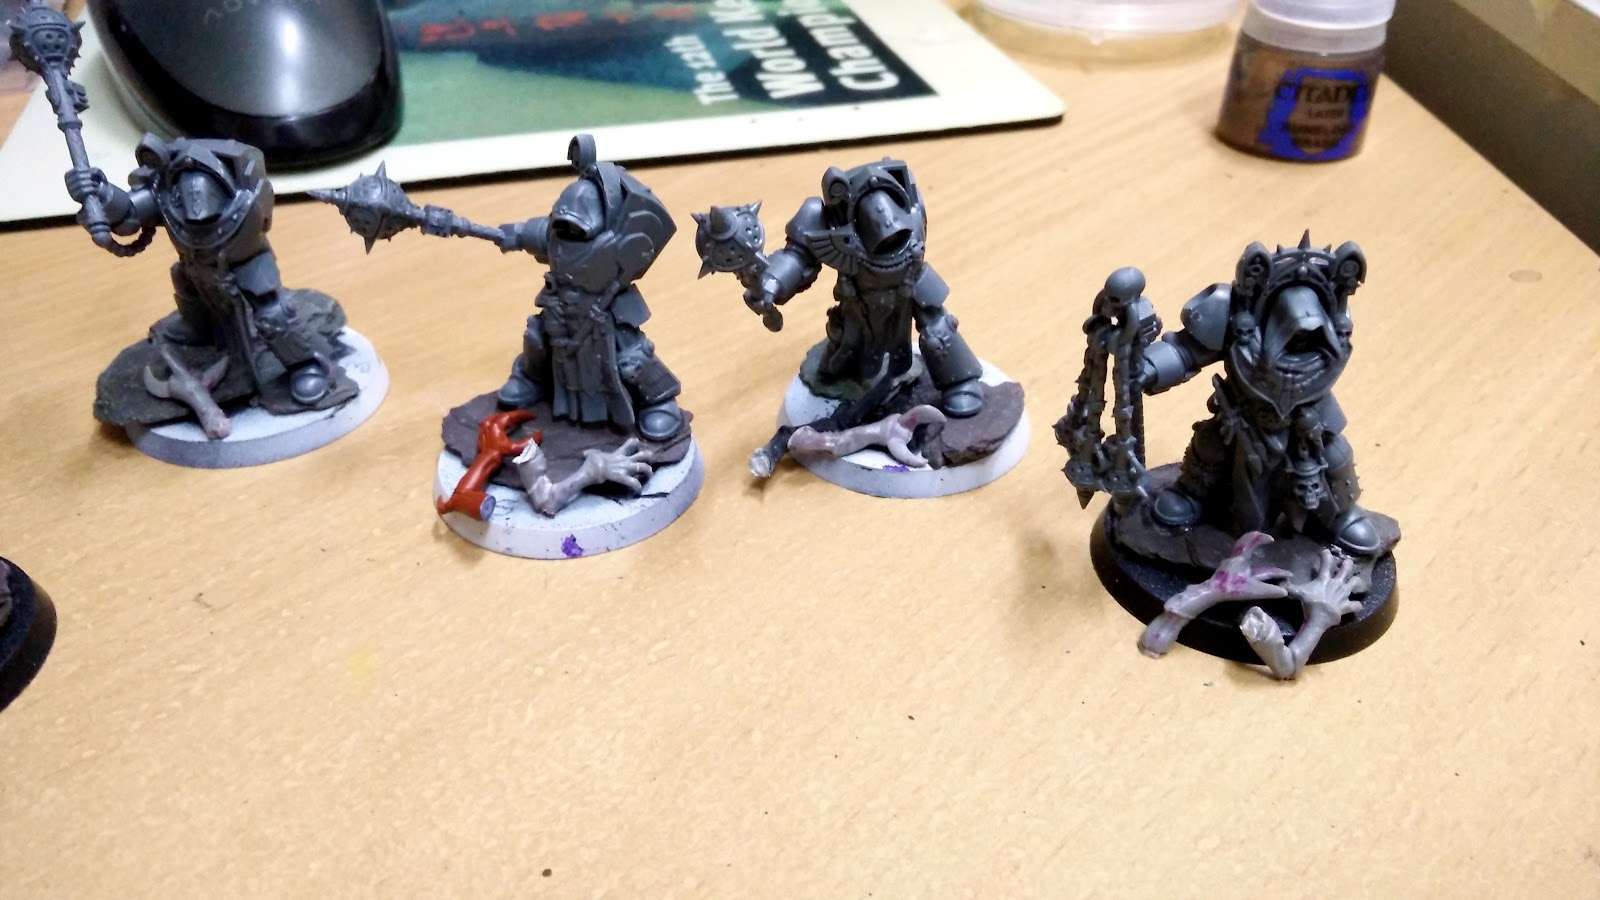
I also looked at the basing, wanting to make them even more imposing with slate and managing to source some pieces that really emphasise some of the more dynamic poses. I have another idea for how to enhance their bases - lots of grasping shattered Genestealer arms and body parts littering the floor. It'll look like they're making a last stand in the rocks killing all and sundry... or like I just stuck a load of random bits on the ground, we'll just have to see.
The following night I spent another session just gluing the models to the base. I started off pinning them then just gave up after the second as it was too much faffing. Straight Super Glue Gel to the base. Then I attached the Mace's aiming for more dynamic poses - about to strike down from high with furious vengeance. Most Knight look pretty static but I was surprised how energetic looking I was able to get with these. Out the window went my rule to keep things contained so as transportation is easier.
I'll be looking into painting the shields separately in most cases, otherwise they'll cover parts I need to paint. Also you can see from the above picture my idea with the Stealer claws... I'm not sure it works. It reminds me of how Otty can put all sorts of nid bits on his bases and it looks unnaturally alien and makes some sort of sense but as soon as I try it looks like I just stuck a spare bit on the base. I think if there was more room and I could fit a torso on or something it'd work but I think I'm better off just going simple.
Don't worry, I haven't snuck in a totally random side project. I was looking on ebay and one of the German sellers that tends ot have a lot of Tyranid bits had these amazing Alpha Legion auctions up. I was immediately struck by the Red Planet BASE! - so simple and effective, red, wash, red and bleached static grass clumps. The Alpha Legion really works against that base.
There are also some pretty cool scouts too, those head-swaps make them look really creepy and the red cloaks do a grand job of helping camouflage them.
There's also two lots of Terminators, I think the pics may have go all mixed up though but they're really cool with some extensive use of third party components by the looks of it but they're not deminished in any way because of it.
With these scratchbuilds there are a number of elements that I would consider 'obstacle to progress' but in reality are actually quite simple tasks that only require an evenings effort to achieve. As such that should be quite rewarding - I fill all the plastic out with PVA's tissue paper and by the end of the night the job is done the next part begins and I should be happy.
Unfortunately I have to get through the tissue and PVA process, which is yucky and I don't like it so it becomes a hurdle but in this case I was still motivated from overcoming the chitin plate obstacle and hopefully the momentum will carry me through the icing and sculpting stage too. As you can see I was a little creative with the tissue, using an old brush cleaning paper towel that really was only good for the bin but I've been using it for so long I thought it better to enshrine it within the structure.
I did use a load of tissues that came from a coffee shop which mashed up much better in the water and PVA. I guess there really is a difference between tissue and paper towel consistency [I know how obvious that sounds, but it's worth noting].
You can really see the difference on the other side of the spine, this has become more like papier mâché than glued paper. I'm going to be covering it all up anyway so it doesn't matter but if your sculpting skill aren't great that's two different option of how to detail your model. The paper towels make an effective musculature, I'm sure with a few successive coats of PVA you could easily just paint it red, cover it in Tamiya Clear Red X-27 and it'd look awesomely disgusting. Alternatively the tissue makes a different, more mineral looking finish that could be equally effective.
The smaller supports will also have fleshy joins to the main battlements. This is something I considered on the Bastion but never did, having the bone walls join directly to the Chitin towers, but for this I'm going to have exposed flesh between the armour plates and the walls.
And just because here's a close up of the paper towels, that really looks like some fibrous meaty musculature. You probably could even get away with not painting it, it's already got some crazy colours going on.
And again at this point I'm wondering should I have prepared the second one...? Next up - lets ice this sucker!
I felt a bit bad that I'd posted some sparse hobby shop pictures recently so when I nipped to GW Manc to try and resolve my intermediary brass metal issue I thought I'd try and remebdy that. First up I remebered to take shots of the WiP fantasy... sorry Sigmar galleon
Thats a lot of clothes pegs and coffee stirrers, not to mention actual GW marketing materials.
I got anothe rpic of this amazing Spawn of Cryptus.
These Knights are so awesome.
The checks were brilliant and the weathering subtle but higghly effective and well applied.
I thought the diamond formation for the banner was particularly ingenious, something I may steal myself. I was also impressed with the banner pole, very reminiscent of th eoriginal banner poles for the Epic Reaver Knights. I asked what it was made from and there was a significant list of bits so whether I can replicate it down the line we'll see...
They make a pretty impressive army.
Some Space Mongrels.
Iron Hands, sorry about the blur, the display was rotating at the time.
To be honest I only really took the pictures because of Red Planet BASE!
This Knight was also quite interesting. There was a subtle camo pattern built into the grey.
Close up I'm not sure it's the best quality in the world [no disrespect] but there is definitely a level of skill in that pattern and the spotting that's been applied. But it's also heavily influenced by the War Griffons so I really like that.
Some pretty standard Necrons, but dark Red Planet BASE! makes them look awesome. It's a different way to do it but it really works, so versatile.
Alternatively Martian Iron Eath gives you a different take on Red Planet BASE! , so versatile.
I don't know what chapter this is but it was pretty striking and consistent.
It looks like the store's hive fleet - the green one has had some reinforcements with the blue [Fleshborer Hives FTW]